Want to take your makeup game to the next level? You’re in the right place.
Whether you’re getting ready for a big event or just want to look flawless every day, these pro makeup tips will help you achieve a stunning look with ease. Imagine having the confidence to highlight your best features and hide imperfections like a true expert.
Keep reading, and you’ll discover simple tricks that makeup artists use—tricks you can start using right now. Your beauty routine is about to get a powerful upgrade.
Prepping Your Skin
Prepping your skin is the foundation of any flawless makeup look. It ensures your makeup not only looks better but lasts longer throughout the day. Skipping this step often leads to patchy or uneven application, which no one wants.
Cleansing Essentials
Start with a clean face to remove dirt, oil, and leftover products. Use a gentle cleanser suited to your skin type—whether it’s foaming, cream, or gel-based. This step helps your skin breathe and prevents clogged pores under makeup.
Do you know how often you should cleanse before applying makeup? Ideally, cleanse twice daily to maintain a fresh canvas. Avoid harsh scrubs that can irritate your skin and cause redness.
Moisturizing Techniques
Hydrated skin creates a smooth surface for makeup to glide on evenly. Choose a moisturizer that matches your skin’s needs—lightweight for oily skin, richer creams for dry skin. Apply it with gentle upward strokes to boost circulation.
Don’t forget to let your moisturizer absorb fully before moving on. This prevents makeup from sliding off or clumping. Adding a few drops of facial oil can also give your skin a natural glow.
Priming For Longevity
Primer acts like a barrier between your skin and makeup, controlling oil and filling in fine lines or pores. Pick one designed for your skin concerns, such as mattifying for oily skin or hydrating for dry areas. Applying primer can drastically improve how long your makeup stays put.
Have you ever noticed your foundation fading by midday? Primer helps lock everything in place, reducing the need for touch-ups. Dab it lightly, focusing on areas where makeup tends to wear off fastest.

Credit: www.youtube.com
Choosing The Right Foundation
Choosing the right foundation is the cornerstone of any flawless makeup look. It can either enhance your natural beauty or create an uneven, cakey appearance. Understanding your skin and the variety of foundation options available helps you make confident choices that suit your style and skin needs.
Matching Skin Tones
Finding a foundation that matches your skin tone perfectly is more than just picking a color from the bottle. Test shades along your jawline in natural light to see how well they blend into your neck and face.
Don’t settle for something that looks good only indoors or under artificial light. Ask yourself if the foundation disappears seamlessly or leaves a noticeable line.
Consider your undertone—cool, warm, or neutral—to refine your choice. If you struggle to identify your undertone, try checking the veins on your wrist: blue or purple veins indicate cool undertones, green veins suggest warm, and a mix points to neutral.
Foundation Types Explained
Not all foundations are created equal. Each type offers unique benefits depending on your skin type and the finish you desire.
- Liquid Foundation:Great for most skin types, especially normal to dry skin. It provides buildable coverage and a natural finish.
- Powder Foundation:Ideal for oily skin and quick touch-ups. It controls shine but may emphasize dry patches.
- Cream Foundation:Offers rich coverage and works well for mature or dry skin. It gives a dewy, hydrated look.
- Stick Foundation:Convenient for on-the-go application. It’s versatile but can feel heavy if over-applied.
Think about your daily routine and skin concerns before choosing. Are you looking for longevity, hydration, or sheer coverage? Your foundation should support your lifestyle, not complicate it.
Application Tools
The way you apply your foundation affects the final look just as much as the product itself. Using the right tools can elevate your makeup game effortlessly.
- Brushes:Provide precision and a smooth finish. Ideal for liquid and cream foundations. Choose a dense, flat-top brush for full coverage or a fluffy brush for a lighter look.
- Sponges:Perfect for blending and achieving a natural, airbrushed effect. Dampening your sponge before use helps prevent absorbing too much product.
- Fingers:Sometimes the best tool is your own hands. The warmth helps foundation melt into the skin for a seamless finish, especially with cream formulas.
Have you noticed how your foundation looks different when applied with a brush versus a sponge? Experiment to find what feels comfortable and gives you the best results.
Concealing Like A Pro
Mastering the art of concealing is a game-changer for flawless makeup. It’s not just about hiding imperfections but enhancing your natural beauty with precision. Let’s dive into how you can conceal like a pro and elevate your makeup routine.
Targeting Problem Areas
Focus on the areas that need the most attention first. Dark circles, blemishes, redness, and uneven skin tone each require a different approach.
- Dark circles:Apply concealer in a triangle shape under your eyes to brighten and lift your face.
- Blemishes:Dab concealer directly onto spots using a small brush or fingertip for precise coverage.
- Redness:Target around the nose, chin, and any inflamed spots.
Have you ever noticed how skipping this step can make your makeup look patchy? Targeting these areas carefully sets a smooth canvas for the rest of your makeup.
Color Correcting Tricks
Color correcting can transform the way your concealer performs. Using the right shades neutralizes unwanted tones before you even apply your concealer.
- Peach or orange:Perfect for blue or purple under-eye circles, especially on medium to dark skin tones.
- Green:Cancels out redness from acne or rosacea.
- Purple or lavender:Brightens dull or sallow skin.
Try applying a thin layer of the color corrector only where needed, then blend it out gently before your concealer. This technique can save you from using heavy layers of concealer that look cakey.
Blending Tips
Blending is where your concealing effort either shines or falls flat. Use a damp beauty sponge or your ring finger for the most natural finish.
- Pat gently instead of rubbing to avoid removing product.
- Start from the center of the area and blend outward for seamless edges.
- Layer concealer in thin amounts to build coverage gradually.
Have you ever tried blending with a brush only to end up with streaks? Switching to a sponge or fingers can create a skin-like finish that looks effortless and fresh.

Credit: blowltd.com
Perfecting Your Eye Makeup
Perfecting your eye makeup can transform your whole look. Eyes draw attention, so enhancing them makes a big difference. Simple techniques help create stunning results with ease. Focus on shaping, shading, lining, and coating lashes for a polished finish.
Shaping Eyebrows
Eyebrows frame the eyes and balance the face. Start by brushing your brows upward with a spoolie. Remove stray hairs below and between brows for a clean shape. Fill sparse areas using light, feathery strokes with a brow pencil. Choose a color close to your natural hair shade. Set brows with a clear or tinted gel to keep hairs in place all day.
Eyeshadow Techniques
Eyeshadow adds depth and dimension to your eyes. Use a light shade across the entire lid to brighten. Apply a medium shade on the crease for natural definition. Blend well to avoid harsh lines. For evening looks, deepen the outer corners with a darker shade. Use shimmer shades in the inner corners to make eyes pop.
Eyeliner Styles
Eyeliner shapes the eyes and adds drama. Pencil liners give a soft, smudged effect. Liquid liners create sharp, defined lines. Try a thin line close to your lashes for subtle enhancement. For bold looks, wing the liner out at the corners. Use waterproof formulas to prevent smudging.
Mascara Mastery
Mascara opens up and lengthens your lashes. Start at the base and wiggle the wand upward. Apply multiple coats for extra volume and length. Use a lash comb to separate clumps. Choose waterproof mascara for long-lasting wear. Replace mascara every three months to avoid eye infections.
Sculpting With Contour And Highlight
Sculpting with contour and highlight is a powerful way to enhance your natural features and add dimension to your face. It’s not about changing your look, but enhancing the structure that’s already there. Understanding where to place contour and highlight can transform your makeup from flat to fabulous.
Contour Placement
Contour should mimic the shadows naturally cast on your face. Focus on areas like under your cheekbones, along your jawline, the sides of your nose, and your temples. These spots create depth and make your face look slimmer and more defined.
Try using a contour shade that is only two shades darker than your skin tone for a subtle effect. Remember, less is more—you can always add more if needed. Have you noticed how a well-placed contour can change your entire face shape?
Highlighting Glow Points
Highlight brings forward the parts of your face you want to emphasize by adding light. Apply it to the high points like the tops of your cheekbones, the bridge of your nose, your brow bones, and the cupid’s bow. These areas catch light naturally and give your skin a radiant glow.
Choose a highlight shade with a soft shimmer or a natural glow instead of heavy glitter. It’s about enhancing, not overpowering. Think about where light hits your face first—those are your glow points.
Blending For Natural Effect
Blending is the key to avoiding harsh lines and creating a seamless transition between contour, highlight, and your base makeup. Use a damp makeup sponge or a soft brush to blend in small, circular motions. The goal is to make the contour and highlight look like part of your skin, not makeup on your skin.
Take your time blending and step back to check your work in natural light. Have you ever seen makeup that looks too sharp or painted on? Blending fixes that instantly.

Credit: www.youtube.com
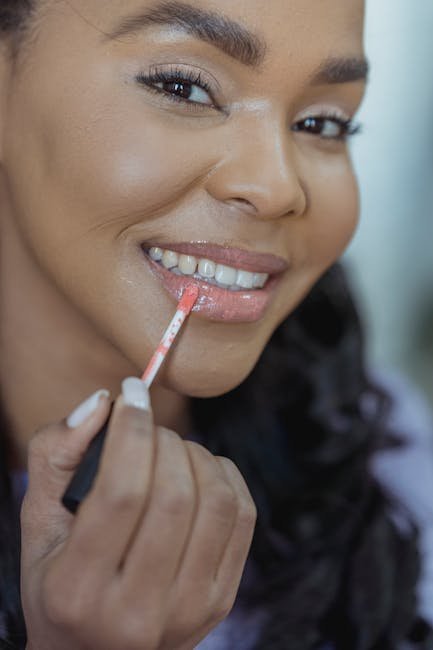
Choosing And Applying Lip Colors
Choosing and applying the right lip color can transform your entire look. It’s not just about picking a shade that looks good on you, but also about preparing your lips properly and making the color last throughout your day. Let’s break down how to care for your lips, select colors that suit you, and apply them for long-lasting impact.
Lip Care Basics
Healthy lips create the perfect canvas for any lip color. Start by exfoliating gently to remove dry, flaky skin. You can use a simple sugar scrub or a soft toothbrush for this.
After exfoliation, always moisturize with a nourishing lip balm. This keeps lips soft and prevents your lipstick from cracking or settling into fine lines. Try to avoid balms with heavy fragrances that might irritate sensitive lips.
Have you noticed your lipstick looks patchy on some days? Often, it’s because lips aren’t properly prepped. Consistent care makes a huge difference in how your lip color appears and feels.
Color Selection Tips
Choosing the right lip color depends on your skin tone, the occasion, and even your mood. If you have fair skin, shades like soft pinks, peaches, and nude tones usually complement well. For medium skin tones, berry shades, mauves, and warm reds can be stunning.
Darker skin tones often shine with deep reds, plums, and rich browns. Don’t shy away from bold colors if they make you feel confident. The key is to test the color in natural light and see how it blends with your overall makeup.
Ask yourself: Does this color highlight my best features? Does it make me feel empowered? Your answers will guide you to the perfect shade.
Long-lasting Application
To keep your lip color intact for hours, start with a lip liner that matches your lipstick. Outline your lips and fill them in slightly to create a base that grips the color.
Apply your lipstick using a brush for precision, especially around the edges. After the first layer, blot gently with a tissue and apply a second coat to deepen the color.
For extra staying power, lightly dust translucent powder over a tissue pressed against your lips. This sets the color without dulling the finish. Carry your lipstick for quick touch-ups but notice how these simple steps extend wear time.
Setting Your Makeup
Setting your makeup is the final step that locks in all your hard work and ensures your look lasts throughout the day. It’s not just about spraying or dusting something on your face; it’s about choosing the right products and techniques that suit your skin type and lifestyle. Let’s break down how you can keep your makeup fresh and flawless from morning to night.
Powders Vs. Sprays
Choosing between powders and sprays for setting your makeup depends on your skin type and the finish you want.
- Setting Powders:Great for oily skin as they absorb excess shine. Use a translucent powder with a fluffy brush to lightly dust your face, focusing on the T-zone.
- Setting Sprays:Ideal for dry or combination skin because they add a natural, dewy finish. Hold the spray about 8-10 inches from your face and mist evenly.
Have you noticed how powders can sometimes make your skin look cakey? That usually means you’ve applied too much. Sprays can feel refreshing but be careful not to overdo it, or your makeup might slide off.
Touch-up Tips
Carrying the right tools can save your look when you’re out and about. A small blotting paper pack is a must-have to remove excess oil without disturbing your makeup.
- Keep a mini powder compact for quick touch-ups on shiny areas.
- Use a travel-size setting spray to refresh your face and melt powders back into the skin.
- Carry cotton swabs or a small concealer brush to fix any smudges or faded spots.
Do you ever find your makeup fading but hesitate to add more product? Light, targeted touch-ups often work better than layering on more, which can weigh your skin down.
Avoiding Makeup Meltdown
Heat, humidity, and stress can all cause your makeup to break down during the day. Preparing your skin properly before makeup application is key.
- Always moisturize and use a primer tailored to your skin type.
- Avoid touching your face frequently to prevent transferring oils and dirt.
- Choose long-wear and waterproof formulas for critical areas like eyes and lips.
Have you ever wondered why your makeup melts faster on some days? It often comes down to how well your skin is prepped and the products you choose. Experiment with different primers and setting products to find what truly holds up for you.
Tools And Brushes Every Pro Uses
Every professional makeup artist knows that the right tools make all the difference. It’s not just about the products you use, but how you apply them that creates a flawless look. Your brushes and tools are extensions of your hands; choosing the right ones can elevate your makeup game instantly.
Essential Brushes
Start with a versatile set that covers all your basic needs:
- Foundation Brush:A dense, flat-topped brush for smooth, even coverage.
- Blending Brush:Soft, fluffy bristles perfect for seamless eyeshadow transitions.
- Angled Brush:Ideal for precise eyeliner or filling in eyebrows.
- Concealer Brush:Small and tapered for targeting blemishes or under-eye areas.
- Fan Brush:Great for applying highlighter or sweeping away fallout.
Having these essentials saves time and improves the quality of your makeup application. Have you noticed how a poorly chosen brush can ruin an otherwise great product?
Cleaning And Maintenance
Dirty brushes aren’t just unhygienic—they can cause breakouts and uneven makeup. Clean your brushes at least once a week using gentle brush cleansers or mild soap.
Rinse thoroughly and reshape the bristles before laying them flat to dry. Avoid drying them standing up, as water can loosen the glue and shed bristles.
Keeping your brushes in good shape extends their life and keeps your skin clear. When was the last time you gave your brushes a proper wash?
Storage Solutions
How you store your brushes affects their longevity and hygiene. Use holders or cups that keep brushes upright and separated to maintain their shape.
Consider a brush roll or case if you travel often. This protects bristles from damage and dirt.
Organize your tools so you can quickly find what you need without digging through clutter. Does your current setup make your makeup routine easier or more stressful?
Daily Makeup Hacks
Daily makeup hacks save time and keep your look fresh all day. These tips make your routine simple and effective. Small changes create big results without stress.
Speedy Routines
Choose quick steps to get ready fast. Use tinted moisturizers instead of heavy foundation. Apply mascara on top and bottom lashes to open eyes quickly. Blend cream blush with fingers for a natural glow.
Keep tools clean and organized. This reduces time searching and speeds up your routine. Practice one or two favorite looks to do them without thinking.
Multi-use Products
Use products that serve more than one purpose. A lip and cheek tint saves space and time. Cream eyeshadows double as eyeliner if applied with a thin brush. Highlighters can brighten eyes and cheekbones in one swipe.
Multi-use products cut down your makeup bag weight. They simplify your routine and reduce waste.
Travel-friendly Tips
Choose small, easy-to-carry makeup items. Stick to basics like mascara, tinted balm, and compact powder. Use a clear pouch to find things fast.
Travel-size products keep your bag light. Blotting papers help control shine without reapplying makeup. Pack a mini brush or sponge for quick touch-ups on the go.
Frequently Asked Questions
What Are The Essential Pro Makeup Tips For Beginners?
Start with clean, moisturized skin. Use a primer for smooth application. Blend foundation well and highlight key areas. Always set makeup with powder or spray for long-lasting wear.
How Can I Make My Makeup Last All Day?
Use a good primer and setting spray. Choose long-wear foundation formulas. Avoid touching your face and blot excess oil. Layer cream and powder products for better staying power.
What Tools Do Professionals Use For Flawless Makeup?
Professional makeup artists use high-quality brushes, sponges, and eyelash curlers. Clean tools regularly to avoid breakouts. Different brushes serve specific purposes like blending and contouring.
How Do I Achieve A Natural Makeup Look Professionally?
Use light coverage foundation or tinted moisturizer. Enhance features softly with neutral shades. Avoid heavy contouring and bold colors. Focus on glowing skin and well-groomed brows.
Conclusion
Achieving a flawless makeup look takes practice and patience. Experiment with different techniques to find what suits you best. Use quality brushes and tools for smoother application. Remember, less is often more. Highlight your natural features rather than concealing them.
Always cleanse your skin before applying makeup. Keeping your skin healthy is crucial. Don’t forget to blend well for a natural finish. Stay updated with new trends but stick to what works for you. Confidence is key. Wearing makeup should enhance, not mask, your beauty.
Enjoy the process and express yourself through your unique style.
