You want your photos to look amazing, right? Whether it’s for a special event, a selfie, or a professional shoot, the right makeup can make all the difference.
But not all makeup shows up the same on camera as it does in person. You might be wondering how to avoid shiny skin, washed-out colors, or uneven tones in your pictures. Don’t worry—this guide will give you simple, effective tips to make your makeup look flawless every time you’re in front of the lens.
Keep reading, and discover how to highlight your best features and feel confident knowing your photos will turn out just the way you want.
Prepping Your Skin
Prepping your skin is the first and most important step for makeup that looks flawless in pictures. Clean, hydrated skin creates a smooth base for makeup application. It helps makeup last longer and appear more natural under camera lights. Taking time to prepare your skin ensures your makeup stays fresh and picture-perfect.
Cleansing And Moisturizing
Start with a gentle cleanser to remove dirt and oil. Clean skin allows makeup to stick better. Use a moisturizer suited for your skin type to keep your skin hydrated. Hydrated skin prevents makeup from looking cakey or dry in photos. Give your moisturizer time to absorb before applying makeup.
Priming For Longevity
Apply a primer to create a smooth surface for makeup. Primers help makeup stay put for hours. They also reduce shine and blur imperfections. Choose a primer that matches your skin needs, such as mattifying for oily skin or hydrating for dry skin. This step improves makeup’s appearance in photos.
Addressing Specific Skin Concerns
Target problem areas before applying foundation. Use color correctors to neutralize redness or dark circles. Apply spot treatments for blemishes or uneven texture. This helps create an even complexion in pictures. Tailor your prep to your skin’s unique needs for the best photo results.

Credit: www.youtube.com
Choosing The Right Foundation
Choosing the right foundation is key for stunning photos. The right base evens out your skin tone and hides imperfections. It also helps your makeup last longer under bright lights and camera flashes.
Picking the foundation that matches your skin perfectly creates a natural look. The finish you choose sets the mood, either fresh and glowing or smooth and matte. Proper application ensures your foundation looks flawless and photo-ready.
Selecting The Perfect Shade
Match your foundation shade to your neck or jawline, not your hand. Test a few shades in natural light for the best match. Your foundation should blend seamlessly without leaving a line.
Consider your undertone: warm, cool, or neutral. Warm tones suit yellow or golden bases. Cool tones look best with pink or blue bases. Neutral tones can wear both.
Matte Vs. Dewy Finishes
Matte finishes reduce shine and work well for oily skin. They keep your face looking smooth and shine-free in photos. Dewy finishes add a healthy glow and suit dry or normal skin.
Dewy foundations give a fresh, radiant look but may reflect light more. Choose matte if your skin gets oily or shiny quickly. Pick dewy for a youthful, glowing appearance.
Application Techniques For Even Coverage
Use a damp makeup sponge for a smooth, even finish. Apply foundation in thin layers and build coverage gradually. Blend well into your hairline and jawline to avoid harsh lines.
Start from the center of your face and blend outwards. Use gentle tapping motions to press the foundation into your skin. Avoid rubbing, which can cause streaks or uneven patches.
Enhancing Eyes For The Camera
Your eyes can be the most captivating part of any photo. They tell a story without words and draw viewers in. Enhancing your eyes for the camera means making them look bright, defined, and expressive without appearing overdone.
Think about what happens when brows are too harsh or eyeshadow blends into your skin tone—your eyes lose their impact. Let’s focus on simple, effective ways to make your eyes stand out naturally and beautifully in pictures.
Defining Brows Naturally
Brows frame your eyes and give structure to your face. Use a brow pencil or powder that matches your hair color closely to fill in sparse areas.
Draw short, hair-like strokes to keep the look soft and natural. Avoid harsh lines that can look artificial on camera. A clear brow gel helps hold hairs in place and adds a polished finish.
Eyeshadow Shades That Pop
Choose eyeshadow colors that contrast with your eye color to make them pop. Warm tones like bronze and copper work wonders on blue eyes, while purples and plums highlight green eyes beautifully.
Matte shades are great for defining the crease, while a shimmer on the lids adds dimension. Don’t forget to blend well—sharp lines can distract the camera and the viewer.
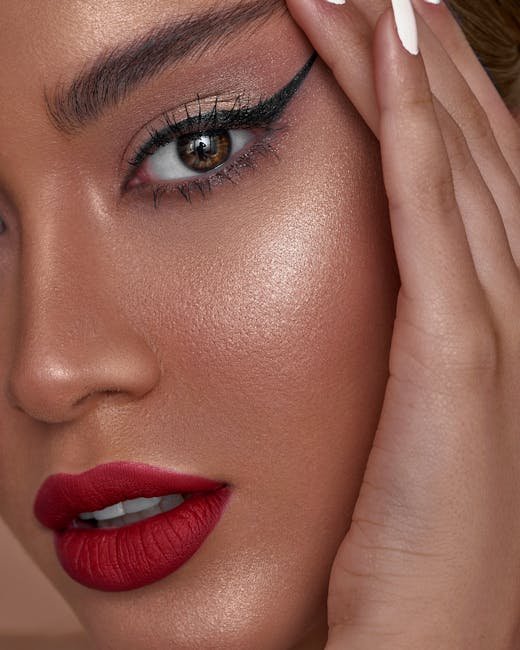
Eyeliner Styles To Open Eyes
A tight, clean line along the upper lash line instantly makes your lashes look thicker. For bigger, more open eyes, try a thin winged liner that lifts the outer corners.
White or nude eyeliner on the waterline brightens tired eyes and makes them appear larger. Avoid heavy liner on the lower lash line; it can close off your eyes in photos.
Mascara Tips For Volume And Length
Start with a lash curler to lift your lashes and open your eyes. Apply mascara from the root to the tip in a zigzag motion to separate lashes and add volume.
Consider layering two formulas: one for length and one for volume. Be careful not to clump, as clumps are more noticeable in photos and can look messy.
Have you noticed how a small change in your eye makeup can completely change your expression on camera? Experiment with these tips and see how your eyes tell a stronger story in every shot.
Credit: www.youtube.com
Flawless Cheeks And Contours
Getting your cheeks and contours right is key to looking stunning in photos. They add structure and life to your face, preventing it from appearing flat or washed out. With the right techniques, you can enhance your natural features and create a radiant, camera-ready look.
Blush Placement For Dimension
Blush isn’t just about adding color; it’s about shaping your face. Apply blush slightly above the apples of your cheeks and blend it back toward your temples. This lifts your face and gives it a healthy glow that shows up beautifully on camera.
Try using a blush shade that complements your skin tone—peachy tones work well for warm skin, while soft pinks brighten cooler tones. Avoid applying blush too low or too close to your nose, as it can make your face look rounder in photos.
Subtle Contouring Tricks
Contouring doesn’t have to be dramatic to be effective. Use a matte contour powder or cream two shades darker than your skin tone and apply it gently along your cheekbones, jawline, and sides of your nose. Blend well to avoid harsh lines that cameras can pick up.
Think about how natural shadows fall on your face in daylight—that’s your guide. A light hand here can define your features and add depth without looking overdone or fake in pictures.
Highlighting To Catch The Light
Highlighting is your secret weapon to catching light and adding a subtle glow. Focus on the high points of your face: tops of cheekbones, brow bones, the bridge of your nose, and cupid’s bow. A creamy or liquid highlighter works well for a natural, dewy finish.
Be mindful not to overdo it; too much shine can cause unwanted glare or make your skin appear oily in photos. Instead, aim for a soft luminance that enhances your features and draws the camera’s eye.
Lips That Stand Out
Lips that stand out make a big difference in photos. They draw attention and add vibrancy to your face. Choosing the right lip makeup ensures your lips stay beautiful and bold. This helps your pictures look polished and lively.
Choosing Long-lasting Lip Colors
Pick lip colors that stay put for hours. Matte lipsticks often last longer than glossy ones. Look for formulas labeled “long-wear” or “smudge-proof.” Bright reds, deep berries, and warm nudes work well on camera. Test the color under natural light before your shoot.
Lining And Filling Techniques
Use a lip liner to shape your lips clearly. Choose a liner close to your lipstick shade. Outline your lips carefully to avoid uneven edges. Fill in the lips with liner to create a base. Then apply lipstick over it for extra staying power. This method prevents feathering and fading in photos.
Gloss Vs. Matte: What Works Best
Matte lips offer a smooth, non-shiny finish. They reduce glare from camera flashes. Glossy lips reflect light and add shine. Gloss can make lips look fuller but may smudge faster. For photos, matte is usually safer and cleaner. Use gloss sparingly on the center of lips for a subtle shine.
Finishing Touches
Finishing touches can make or break your makeup look in photos. They ensure your makeup stays flawless and camera-ready throughout the shoot. Small details matter—your skin’s texture, shine, and evenness will show up clearly on camera, so don’t skip this crucial step.
Setting Makeup To Prevent Shine
Shine is one of the biggest challenges in photography makeup. Use a mattifying setting powder to lock in your foundation and control oil. Press the powder gently onto your T-zone and areas prone to shine instead of brushing it on to avoid disturbing your base.
A setting spray can also help seal your look and reduce flashback. Spritz it lightly from a distance and allow it to dry naturally. You want a matte finish, not a cakey one.
Touch-up Essentials For Photoshoots
Bring a small kit with you for quick fixes during the shoot. Essentials include blotting papers, a compact powder, a lip balm or lipstick, and a small brush or sponge for blending.
Blotting papers are lifesavers when your skin gets oily, especially under strong lights. They remove oil without removing makeup, keeping your face fresh without adding layers.
Avoiding Common Makeup Mistakes On Camera
Heavy contouring can look harsh in photos, so keep it subtle. Overdoing highlighter may cause unwanted shine spots. Instead, focus on natural-looking glow in areas where light hits your face naturally.
Watch out for mismatched foundation shades. Your neck and face should blend seamlessly to avoid the “mask” effect. Test your foundation in daylight before the shoot to ensure a perfect match.
Lighting And Makeup Interaction
Lighting plays a huge role in how your makeup looks in photos. Different lighting can change the way colors and textures appear on your skin. Understanding how makeup interacts with various light sources helps you create a flawless look that shines in every shot.
Adapting Makeup For Natural Light
Natural light is soft and flattering, but it also exposes every detail. You want to use foundation that matches your skin tone perfectly to avoid any harsh lines. A light hand with shimmer or highlighter works best since too much shine can look oily in daylight.
Have you noticed how your blush can disappear outdoors? Adding a bit more color than usual helps your cheeks stand out without looking overdone. Consider creams over powders—they blend smoothly and keep your skin looking fresh.
Adjusting For Studio Lighting
Studio lights are strong and focused, often washing out your face. To combat this, use slightly heavier coverage foundation to create a smooth canvas. Contouring becomes essential here; it adds depth and dimension that bright lights tend to flatten.
Matte finishes prevent unwanted shine under intense lighting. You might want to bring up your eye makeup and lips a notch—colors look less vibrant under studio lights, so don’t be afraid to go bold. Ever tried layering lip colors? It holds better and pops more in photos.
Using Reflectors And Diffusers
Reflectors bounce light back onto your face, softening shadows and highlighting your best features. If you’re outside, a white or silver reflector can add a natural glow without extra makeup. This trick saves you from over-applying product just to stand out.
Diffusers soften harsh light, reducing glare and preventing your skin from looking washed out. You can create softer photos by placing a diffuser between the light source and your face. Have you ever felt your makeup looked perfect in person but harsh in photos? This simple tool might be why.

Credit: www.maybelline.co.in
Frequently Asked Questions
How To Choose Makeup Colors For Photos?
Opt for colors that enhance your natural features and suit the lighting conditions. Warm tones like peach and bronze work well in most settings. Avoid overly shimmery products as they can reflect light and cause a shiny appearance. Test your makeup under similar lighting conditions to ensure it photographs well.
Which Foundation Is Best For Photo Shoots?
Choose a matte, long-wearing foundation to reduce shine and provide even coverage. It should match your skin tone closely. Avoid SPF-heavy foundations as they can cause flashback in photos. A buildable formula allows you to adjust coverage as needed for different lighting conditions.
How To Avoid Shiny Skin In Pictures?
Use a matte primer and setting powder to control oil. Blotting papers are also handy for quick touch-ups. Apply powder lightly to prevent a cakey look. Choose oil-free makeup products to reduce shine, and avoid overly dewy products that can reflect light.
What Eye Makeup Works Best For Photos?
Opt for neutral eyeshadows and waterproof mascara for a polished look. Define your eyes with eyeliner to make them pop in pictures. Avoid heavy glitter as it can cause unwanted reflections. False lashes can enhance your eyes, but choose natural-looking ones for a subtle effect.
Conclusion
Photoshoot makeup needs a light but clear touch. Choose colors that match your skin tone well. Use powder to reduce shine on your face. Blend makeup softly to avoid harsh lines. Highlight your eyes to make them stand out. Keep lips natural with soft shades.
Check your look in natural light before photos. Practice these tips to feel confident and look great. A good makeup look helps your photos shine bright. Simple steps create lasting, beautiful picture memories.
