
Unlock the secret to a sculpted, flawless face with our ultimate makeup contouring tips! Imagine walking into any room with the confidence of a runway model, knowing your makeup enhances your natural beauty.
You don’t need to be a professional makeup artist to achieve this; all it takes is a few clever techniques and the right products. Are you ready to transform your daily makeup routine into a work of art? Dive into this guide to discover how contouring can elevate your look, boost your confidence, and make you feel unstoppable.
Get ready to embrace a new level of beauty that starts with just a few brush strokes.
Choosing The Right Products
Choosing the right products is key to effective makeup contouring. The right contour products help shape your face naturally. They enhance your features without looking harsh or unnatural. Picking products that suit your skin type and tone makes application easier and results better.
Contour Formulas: Cream Vs Powder
Cream contours blend smoothly and give a dewy finish. They work well on dry or normal skin. Creams are easy to build up for more definition. Powders offer a matte finish and suit oily skin better. They are quick to apply and great for beginners. Choose cream for a soft look, powder for a sharper effect.
Selecting Shades For Your Skin Tone
Pick contour shades two to three tones darker than your skin. Avoid colors with too much red or orange. Cool or neutral brown shades work well on most skin tones. Test shades on your jawline or neck to check the match. Highlight shades should be one to two tones lighter than your skin. This contrast creates a natural shadow and light effect.
Tools For Precise Application
- Use a dense contour brush for powders to control product placement.
- For creams, a beauty sponge helps blend edges seamlessly.
- Angled brushes fit perfectly into cheek hollows and jawlines.
- Use clean fingers to warm cream products before blending.
- Small detail brushes work well for nose contouring.
Choosing the right tools ensures smooth and precise contour lines. It prevents harsh edges and patchy results. Always clean your tools regularly for the best finish.
Prepping Your Skin
Prepping your skin is the foundation of flawless contouring. Without a smooth, hydrated base, contour products can settle unevenly or fade quickly. Taking the time to properly prepare your skin ensures your makeup looks natural and lasts longer throughout the day.
Cleansing And Moisturizing
Start with a clean canvas by washing your face with a gentle cleanser suited to your skin type. This removes dirt, oil, and leftover makeup that can interfere with product application.
After cleansing, apply a moisturizer to keep your skin hydrated and smooth. Dry patches can cause contour lines to look harsh or patchy, so moisturizing is key to an even finish.
If you struggle with oily skin, opt for a lightweight, oil-free moisturizer to avoid excess shine. Have you noticed how skipping moisturizer makes your contour look cakey?
Priming For Longevity
Primer creates a barrier between your skin and makeup, helping products adhere better and last longer. Choose a primer based on your skin needs—mattifying for oily skin or hydrating for dry skin.
Applying primer evenly lets your contour blend seamlessly without sliding off. A small pea-sized amount is usually enough; too much can cause makeup to break down faster.
Think about how primer can transform your makeup routine. Have you ever seen contour stay fresh all day after adding this simple step?
Setting The Base
Once your moisturizer and primer have settled, set your base with a light dusting of translucent powder. This step locks in moisture and prevents your foundation from moving.
Use a fluffy brush to apply powder gently, focusing on areas where makeup tends to fade or crease, like the T-zone. Avoid heavy powder application, which can dull your contour’s natural shadows and highlights.
Have you experimented with setting powder to see how it affects your contour’s longevity and appearance?
Mapping Your Face
Mapping your face is the first step in contouring makeup. It helps you know where to apply darker and lighter shades. This technique shapes and defines your natural features. It creates a balanced and polished look that suits your face.
Identifying Natural Shadows
Natural shadows appear where your face curves inward. These areas are perfect for contouring. Common shadow spots include:
- Under cheekbones
- Sides of the nose
- Jawline
- Hairline near the temples
- Under the chin
Use a contour product a few shades darker than your skin tone. Apply it lightly on these areas to add depth.
Highlighting Key Areas
Highlighting brings forward parts of your face. It makes your skin look bright and fresh. Focus on these spots:
- Top of cheekbones
- Bridge of the nose
- Center of the forehead
- Under the eyes
- Cupid’s bow
- Chin
Choose a shade lighter than your skin. Apply it gently to catch the light and add dimension.
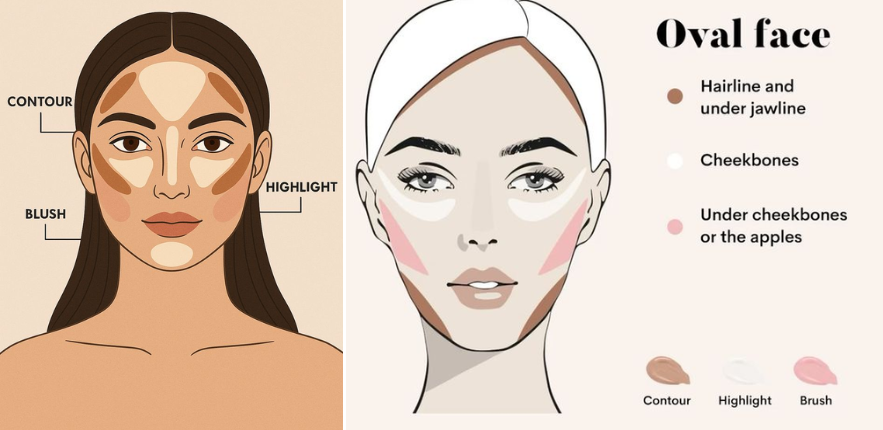
Customizing Contour For Face Shapes
Each face shape needs a unique contour approach. Here are simple tips for common shapes:
| Face Shape | Contour Focus |
|---|---|
| Round | Contour sides of the forehead and under cheekbones to slim face |
| Oval | Light contour under cheekbones and jawline to maintain natural balance |
| Square | Soften jawline and temples with contour to create roundness |
| Heart | Contour sides of forehead and chin to balance wide forehead and narrow chin |
| Long | Contour forehead and chin to shorten face length visually |
Adjust contour placement based on your face shape for best results.
Credit: www.bookeventz.com
Application Techniques
Mastering makeup contouring starts with the right application techniques. How you apply your products can make the difference between a natural look and one that appears harsh or artificial. Focus on the way you blend, layer, and use light and shadow to sculpt your face seamlessly.
Blending Like A Pro
Blending is the secret weapon in contouring. Harsh lines ruin the illusion, so soften the edges with a damp beauty sponge or a fluffy brush. Use gentle, circular motions to melt the contour into your skin, avoiding heavy pressure that can move the product around too much.
Think about where your natural shadows fall on your face. Blending should mimic that, not cover it up. Have you tried blending in natural daylight? It often reveals areas that need more smoothing.
Layering For Depth
Building up contour gradually prevents an overdone look. Start with a light layer of contour cream or powder, then add more only where you want extra definition. This technique gives you control and lets you customize the intensity based on your mood or occasion.
Layering also helps the contour last longer. Combining cream and powder products can lock the contour in place. Have you experimented with mixing textures to find what works best for your skin type?
Using Light And Shadow Effectively
Contouring is all about playing with light and shadow to enhance your features. Use lighter shades to highlight areas that catch light naturally, like the tops of your cheekbones, the bridge of your nose, and your cupid’s bow.
Apply darker shades to areas you want to recede or slim down, such as under the cheekbones, along the jawline, and the sides of your nose. Are you positioning your highlights and shadows to complement your unique bone structure?
Finishing Touches
Finishing touches can make or break your contouring look. They help blend everything seamlessly and give your face a polished, natural appearance. Paying attention to these final steps ensures your makeup lasts longer and looks flawless throughout the day.
Setting Your Contour
Once you’ve sculpted your face, set your contour with a translucent powder or a setting spray. This prevents the cream or powder contour from moving or fading. Use a fluffy brush to lightly dust powder on the areas you contoured, avoiding overdoing it to keep the definition sharp.
Have you noticed how your contour can disappear after a few hours? Setting it properly keeps your hard work intact and your features defined all day long.
Adding A Subtle Glow
A little highlight can brighten your contour and add dimension to your skin. Apply a subtle glow on the high points of your face—cheekbones, brow bones, and the bridge of your nose. Choose a highlighter that complements your skin tone for a natural shine instead of an obvious shimmer.
Try using a damp beauty sponge to blend the highlighter into your skin. This technique softens the edges and prevents a harsh contrast with your contour.
Correcting And Refining
Look closely at your contour to see if any lines need softening. Use a clean brush or sponge to blend harsh edges gently. If you spot any areas that look uneven, a little foundation or concealer can help refine the shape.
Remember, contouring is about enhancing your natural features, not masking them. Ask yourself: does this look like me but better? If yes, you’ve nailed the finishing touches.
Credit: www.lemon8-app.com
Common Mistakes To Avoid
Contouring can dramatically enhance your features, but it’s easy to slip up. Avoiding common mistakes will save you from a harsh or unnatural look. Let’s break down some pitfalls you should watch out for to keep your makeup flawless and flattering.
Overdoing Contour
Applying too much contour product can make your makeup look heavy and artificial. Instead of enhancing your natural features, it can create harsh lines that are difficult to blend out. Try using a light hand and build the product gradually to maintain a subtle, sculpted effect.
Ask yourself: does your contour look like a shadow or a stripe? If it’s the latter, you’re overdoing it. Blending is key, so use a damp beauty sponge or a fluffy brush to soften the edges.
Ignoring Face Shape
Contour isn’t one-size-fits-all. Applying the same contour technique regardless of your face shape can highlight the wrong areas. Your goal is to enhance your natural bone structure, not to follow a trend blindly.
For example, if you have a round face, focus on slimming the cheeks and jawline. If your face is long, contouring the forehead and chin can help balance proportions. Tailoring your contour to your face shape makes all the difference in achieving a natural look.
Using Wrong Tools
The tools you choose directly affect the outcome of your contouring. Using a brush that’s too dense can deposit too much product at once. On the other hand, a brush that’s too fluffy might not give you enough control for precise application.
Opt for a contour brush with angled bristles for sharp lines, or a small, dense brush for targeted areas. Remember, your fingers can also be useful for blending cream contours. Experiment with different tools to find what works best for you.
Tips For Different Skin Types
Contouring can dramatically change how your face looks, but the way you contour should depend on your skin type. Different skin types react differently to products and techniques. Knowing how to adjust your contouring routine can make your makeup last longer and look more natural.
Oily Skin Contouring
If you have oily skin, choose matte contour products to avoid extra shine. Cream formulas might slide off or mix with your natural oils, making your contour look patchy. Instead, go for powder contour shades that help absorb oil and keep your makeup in place.
Start by using a mattifying primer before applying your contour. This helps control oil throughout the day. Also, set your contour with a translucent powder to lock it in. Have you noticed how sometimes your makeup disappears midday? This simple step can fix that.
Dry Skin Contouring
Dry skin needs contour products that add moisture and blend smoothly. Cream or liquid contour sticks work best because they don’t cling to dry patches. Before contouring, apply a hydrating primer or moisturizer to create a smooth base.
Use a damp makeup sponge to blend your contour for a natural finish. Avoid heavy powders that can make your skin look flaky. Do you feel like your skin looks dull after contouring? Adding a subtle highlight can bring life back to dry skin.
Sensitive Skin Considerations
For sensitive skin, pick contour products with gentle, non-irritating ingredients. Mineral-based powders or hypoallergenic creams reduce the risk of redness or breakouts. Always test a small amount on your skin before applying your full contour.
Keep your tools clean to avoid irritation and bacteria buildup. If you notice any burning or itching, remove the product immediately. How often do you check your makeup’s ingredient list? Being mindful can save your skin from discomfort.

Credit: www.shefinds.com
Frequently Asked Questions
What Is The Best Contouring Product For Beginners?
Cream contour sticks are ideal for beginners. They blend easily and offer buildable coverage. Start with a shade two tones darker than your skin for natural results.
How Do I Choose The Right Contour Shade?
Select a contour shade two to three shades darker than your skin tone. Avoid shades that are too warm or orange. This ensures a natural shadow effect.
Where Should I Apply Contour On My Face?
Apply contour below cheekbones, along jawline, and sides of the nose. These areas create natural shadows that enhance facial structure effectively.
Can I Contour With Powder Instead Of Cream?
Yes, powder contour works well for oily skin and quick application. Use a matte powder for a natural finish and blend thoroughly to avoid harsh lines.
Conclusion
Contouring can enhance your natural beauty with just a few steps. Use the right shades to highlight and shade your face. Practice helps you find what suits your shape best. Keep your tools clean and blend well for a smooth look.
Remember, subtle changes make a big difference. Enjoy the process and have fun with your makeup. Contouring can boost your confidence and style each day. Keep these tips in mind to create a fresh, polished look.
