
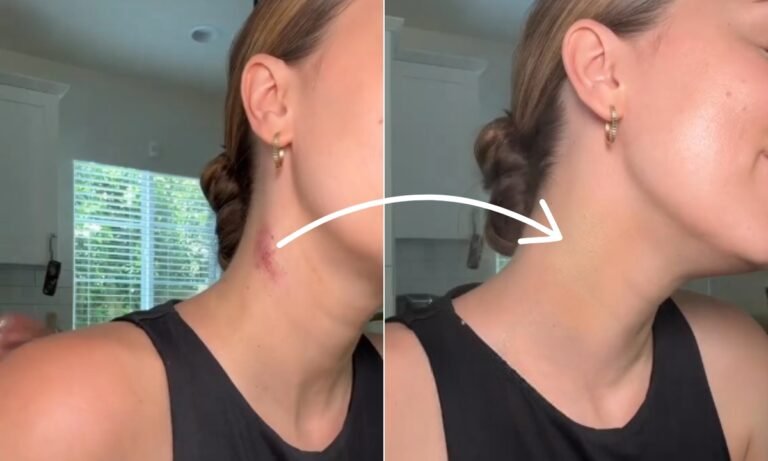
You woke up with a hickey, and now you need to hide it fast. Whether it’s for work, school, or just to avoid awkward questions, knowing how to cover a hickey with makeup can save your day.
You don’t have to stress or hide under scarves. With the right steps and products, you can make that mark disappear like magic. Keep reading, and you’ll learn simple, effective tricks to conceal your hickey quickly and confidently.
Identify The Hickey
Identifying the hickey is the first step to hiding it effectively with makeup. Knowing its size and color helps you choose the right products. Understanding your skin’s sensitivity ensures you avoid irritation while covering the mark.
Check The Size And Color
Look closely at the hickey. Is it small or large? The size affects how much coverage you need. Notice the color too. A fresh hickey is usually red or purple. Older ones turn brown or yellowish. Different shades need different concealers. This helps you pick the right tone for better hiding.
Assess Skin Sensitivity
Touch the area gently. Is your skin tender or normal? Sensitive skin can react to strong makeup products. Use hypoallergenic or gentle formulas to avoid redness or itching. Test a small spot before applying fully. This keeps your skin safe while covering the hickey.

Credit: www.youtube.com
Prepare Your Skin
Preparing your skin is the first key step to hide a hickey with makeup. Clean, smooth skin helps makeup stick better and last longer. It also prevents the hickey from showing through the makeup. Take time to care for your skin before applying any product.
Cleanse And Moisturize
Start by washing your skin with a gentle cleanser. This removes dirt, oil, and sweat. Clean skin creates a fresh base for makeup. Next, apply a light moisturizer. It keeps your skin hydrated and soft. Hydrated skin helps makeup blend smoothly. Use a moisturizer that suits your skin type to avoid irritation.
Apply Primer For Smooth Base
Primer creates an even surface for foundation. It fills in pores and fine lines. Primer helps makeup stay in place all day. Dab a small amount on the hickey area. Gently blend it outward with your fingers. This step reduces redness and uneven texture. A good primer makes concealing easier and more natural.
Choose The Right Concealer
Choosing the right concealer is a game-changer when you want to hide a hickey quickly and effectively. The key is to understand your skin tone and the color of the hickey itself. Picking the wrong concealer can make the mark stand out even more, so knowing what works best for different shades is essential.
Color Correctors For Red And Purple Tones
Hickeys often show up as red or purple marks, and color correctors can neutralize these tones before you apply concealer. If your hickey is more red, a green color corrector works wonders because green cancels out red hues. For purple or blue-ish hickeys, try a yellow or peach corrector to brighten and balance the discoloration.
Applying a thin layer of color corrector can make a huge difference in coverage. You don’t want to pile on too much product, or it will look cakey and unnatural. Have you noticed how a little green corrector under your concealer really smooths out redness?
Full-coverage Vs. Lightweight Concealers
Deciding between full-coverage and lightweight concealers depends on how noticeable your hickey is. Full-coverage concealers are best for deep or large marks because they can completely mask the discoloration. However, they can feel heavy on the skin if used in excess.
Lightweight concealers work well for smaller or fading hickeys. They blend easily and look more natural, but might need layering. What’s your preference—something that fully hides the mark or a product that feels light and breathable on your skin?
Testing a small amount of concealer in natural light can help you see how well it blends and covers. Don’t forget to set your concealer with powder to avoid smudging throughout the day. This small step keeps your makeup looking fresh and your secret safe.
Apply Makeup For Coverage
Applying makeup to cover a hickey is a smart way to regain your confidence and keep your skin looking natural. The key lies in layering the right products carefully and blending them so well that no one notices the mark. Let’s break down the process into simple, doable steps that anyone can follow.
Use Color Corrector First
Start by selecting a color corrector that neutralizes the hickey’s color. Usually, green or yellow tones work best to counteract the red and purple hues of a bruise. Apply a thin layer directly on the hickey with a small brush or your fingertip, gently patting it in to avoid smudging.
Have you tried using a peach or orange corrector for darker skin tones? It can make a big difference in cancelling out the bruising before you add concealer. This step creates a more even base and prevents the bruise color from showing through your makeup.
Layer Concealer Carefully
After the corrector sets for a minute, add a concealer that matches your skin tone. Dab it lightly over the corrected area rather than rubbing it in. This keeps coverage thick where needed without wiping away the color corrector underneath.
Try using a creamy concealer with good pigmentation. It covers better and blends more smoothly. Build the coverage gradually; a single thick layer can look cakey and obvious.
Blend Edges Seamlessly
Once the concealer is in place, blend the edges carefully with a damp makeup sponge or your fingertip. The goal is to fade the makeup into your natural skin so no harsh lines appear. Soft, outward tapping motions work best here.
Have you noticed how blending the edges well can make even heavy coverage look natural? It’s the small detail that fools the eye. Finish with a light dusting of translucent powder to set everything and reduce shine.
Set Makeup For Longevity
Setting your makeup is crucial to keep the hickey hidden throughout the day. Without proper setting, makeup can smudge or fade quickly. This step locks everything in place and prevents unwanted shine or movement.
Focus on sealing the makeup gently and evenly. Use products designed to extend wear time without adding heaviness or cakiness. A good setting routine makes your coverage last longer and look natural.
Use Translucent Powder
Translucent powder is your best friend for a natural finish. It mattifies the skin and absorbs extra oils. Apply it lightly using a fluffy brush or a soft puff.
Press the powder onto the area, don’t rub. This technique keeps the makeup intact and prevents it from moving. Choose a powder that suits your skin tone and type to avoid a white cast.
Optional Setting Spray
Setting spray helps seal makeup with a fine mist. It creates a protective layer that lasts through sweat and humidity. Hold the bottle at arm’s length and spray evenly over your face.
Let the spray dry naturally without touching your skin. This step is optional but highly effective for long-lasting wear. Pick a setting spray that feels light and breathable for comfort.
Credit: www.lemon8-app.com
Additional Tips
Hiding a hickey with makeup works best when combined with smart habits and styling choices. These additional tips will help you keep your hickey under wraps even longer and make your efforts more effective.
Wear Clothing Strategically
Choose tops or scarves that naturally cover your neck area. High collars, turtlenecks, or button-up shirts can be your best friends when you want to hide a hickey.
Think about the colors too—darker shades or patterns can distract the eye from any slight discoloration. Have you ever noticed how a bold print can make skin imperfections less noticeable?
Use Accessories For Extra Cover
Accessories like chunky necklaces, oversized scarves, or even stylish neckties can add an extra layer of coverage. These items not only hide the mark but also add a fashionable touch to your outfit.
When I once had a noticeable hickey right before an important meeting, a simple silk scarf saved the day. It blocked the spot and gave my look a polished vibe.
Avoid Excessive Touching
It might be tempting to rub or pick at the hickey, but this only makes it worse. Touching can irritate the skin and even darken the bruise, making it harder to cover up.
Instead, treat the area gently and resist the urge to check or scratch it repeatedly. Have you noticed how a little patience can make a big difference in healing and hiding marks?
Credit: themombeauty.com
Frequently Asked Questions
How Can Makeup Effectively Hide A Hickey?
Makeup can conceal a hickey by using color correctors and concealers. Start with a green corrector to neutralize redness. Apply a full-coverage concealer matching your skin tone. Blend well and set with translucent powder for a natural finish.
What Makeup Products Work Best To Cover A Hickey?
Use a green color corrector, a high-coverage concealer, and translucent setting powder. The green corrector neutralizes red tones. The concealer hides the mark. Setting powder ensures long-lasting coverage without smudging.
How To Apply Makeup To Avoid Highlighting A Hickey?
Apply thin layers of color corrector and concealer, blending edges carefully. Avoid heavy or cakey makeup. Use a damp makeup sponge for smooth blending. Finish with light setting powder to prevent shine and keep the look natural.
Can Makeup Completely Hide A Dark Hickey?
Makeup can significantly reduce visibility but may not fully hide very dark hickeys. Using multiple layers of color corrector and concealer helps. For best results, combine makeup with other remedies like cold compresses before application.
Conclusion
Covering a hickey with makeup can be simple. Follow these steps for success. Start with a primer to smooth your skin. Use a green concealer to cancel redness. Blend carefully to match your skin tone. Apply foundation gently over the area.
Set everything with a light dusting of powder. Remember to check your makeup in different lights. Practice makes perfect. With these tips, you can confidently hide any hickey. Feel self-assured in any situation. Makeup is a great tool for quick fixes.
Keep practicing and you’ll get better with time.
