Are you looking for a quick and effective way to conceal a bruise with makeup? Whether you’re preparing for a special event or just want to feel more confident in your everyday life, hiding a bruise can be simpler than you think.
Imagine stepping out the door with your skin looking flawless and smooth, leaving worries of visible bruises behind. In this guide, you’ll discover easy, step-by-step techniques using makeup to expertly cover up any blemish. Say goodbye to feeling self-conscious and hello to a boost in confidence.
Keep reading to learn the secrets that will transform your makeup routine and help you feel your best, no matter the occasion.

Credit: www.youtube.com
Choose The Right Concealer
Choosing the right concealer is key to hiding bruises effectively. The right product can blend imperfections smoothly. It helps skin look even and natural. Knowing color correction and concealer types makes a big difference. This guide simplifies picking the best concealer for you.
Color Correcting Basics
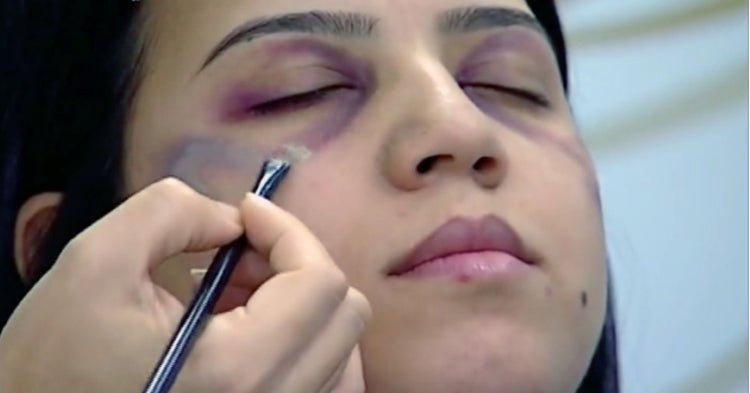
Bruises often show blue, purple, or red tones. Color correctors neutralize these colors before applying concealer. Use a yellow corrector for purple bruises. Peach or orange tones work well for blue areas. Green correctors cancel out redness. Apply a thin layer to the bruise for best results.
Selecting Concealer Shades
Choose a concealer shade close to your skin tone. Too light or dark makes the bruise more visible. Test shades on your jawline or wrist. Pick the one that blends with your natural skin color. For very dark bruises, use a concealer slightly lighter than your skin. Blend edges well for a seamless look.
Types Of Concealers
- Liquid concealers:Lightweight and easy to blend. Good for light to medium coverage.
- Cream concealers:Thicker texture. Offers full coverage for darker bruises.
- Stick concealers:Solid form. Provides heavy coverage and lasts longer.
- Color-correcting concealers:Tinted to neutralize specific bruise colors before regular concealer.
Choose a formula that suits your skin type and bruise severity. Use a makeup sponge or brush for smooth application.

Credit: www.ulike.com
Prep Your Skin
Preparing your skin before applying makeup is essential for hiding a bruise effectively. Good prep creates a smooth surface that helps makeup stick better and last longer. It also prevents the makeup from looking cakey or emphasizing uneven texture around the bruise.
Cleanse And Moisturize
Start with a gentle cleanser to remove dirt and oils without irritating your skin. This step ensures your makeup won’t slide off or patch up unevenly.
After cleansing, apply a lightweight moisturizer. Hydrated skin helps makeup blend seamlessly and keeps the area looking natural. If your bruise feels dry or tight, moisturizing can soften the skin and make coverage easier.
Apply Primer For Smooth Base
Using a primer is a game-changer when covering bruises. It fills in fine lines and smooths the skin’s surface, creating a perfect canvas for concealer and foundation.
Choose a primer with a velvety texture or one designed to correct discoloration. A green-tinted primer can neutralize the purple or red tones of a bruise, making your job much easier. Have you tried primer before makeup, or do you usually skip this step? You might be surprised how much difference it makes.
Apply Color Corrector
Applying a color corrector is a vital step to hide a bruise effectively. It balances the discoloration and prepares the skin for foundation. Using the right color corrector tones down the bruise’s natural colors. This step creates a smooth canvas for flawless makeup coverage.
Neutralize Bruise Colors
Bruises show different colors depending on their age and severity. Purple and blue hues need orange or peach correctors. Yellow and green bruises work well with purple or pink correctors. Using the opposite color on the color wheel cancels out the bruise’s shade. This technique reduces the visibility of the bruise before applying foundation.
Blending Techniques
Blend the color corrector gently using a clean fingertip or a makeup sponge. Patting motions work better than rubbing to avoid irritating the skin. Blend only around the bruise edges, not over the entire face. This keeps the correction focused and natural-looking. Layer thin amounts to build coverage gradually without caking.
Conceal The Bruise
Concealing a bruise with makeup requires careful steps to ensure it looks natural. The goal is to blend the makeup seamlessly with your skin tone. Using the right products and tools improves the coverage and finish. Light layers help avoid a cakey or heavy look. This section explains how to hide bruises effectively.
Layering Concealer
Start with a color corrector to neutralize the bruise color. Use a peach or orange tone for blue or purple bruises. Dab the corrector gently and blend the edges softly.
Apply a concealer that matches your skin tone over the corrected area. Use a small brush or fingertip to pat the concealer on. Avoid rubbing to keep coverage intact.
Build coverage by applying thin layers. Let each layer dry before adding the next. This technique prevents cracking and makes the makeup last longer.
Using The Right Tools
Choose a dense, flat brush for precise concealer application. It helps place the product exactly where needed. A beauty sponge works well for blending edges softly.
Use clean tools to avoid spreading bacteria. Wash brushes and sponges regularly to maintain skin health.
Set the makeup with a translucent powder using a fluffy brush. This step locks the makeup in place and reduces shine.
Set The Makeup
Setting makeup is a crucial step to keep your bruise coverage flawless throughout the day. It locks the concealer and foundation in place, preventing smudging or fading. Proper setting ensures a natural finish and extends the wear time of your makeup.
The right setting product and application method make a big difference. It helps maintain the coverage without adding extra weight or texture. This step also controls shine and keeps your skin looking smooth.
Choosing Setting Powder
Select a setting powder that matches your skin type and tone. Translucent powders work well for most skin tones and avoid altering the color of your makeup. For dry skin, choose a finely milled, hydrating powder. Oily skin benefits from mattifying powders that absorb excess oil.
Look for powders labeled as lightweight and buildable. Avoid heavy or cakey formulas that can make the makeup look unnatural. Some powders contain ingredients that blur imperfections, which is helpful for hiding bruises.
Proper Application Methods
Use a clean, fluffy brush or a makeup sponge to apply setting powder. Lightly press or pat the powder onto the concealed area instead of rubbing. This prevents disturbing the coverage underneath.
- Start with a small amount and add more if needed.
- Focus on the center of the bruise and blend outward.
- Use gentle, tapping motions to avoid moving the concealer.
Finish by lightly dusting the powder over your entire face to create a uniform look. This helps the bruise blend seamlessly with the rest of your skin. Setting your makeup properly keeps the coverage intact and your skin looking fresh all day.
Touch Up Tips
Keeping your makeup fresh throughout the day helps maintain a flawless look. Touch ups prevent the bruise from showing through as makeup fades or smudges. Simple tricks make refreshing your cover-up quick and easy. Staying prepared ensures confidence all day long.
Carry Essential Products
Always bring a small kit with you. Include a color corrector to neutralize the bruise tone. A concealer close to your skin shade is a must. Compact powder helps set the makeup and control shine. A small brush or sponge makes blending simple. Keep makeup remover wipes for quick fixes.
Fixing Smudges And Fading
Gently dab the affected area to remove excess oil or sweat. Avoid rubbing to keep coverage intact. Apply a thin layer of concealer only on faded spots. Blend softly around the edges to avoid harsh lines. Lightly dust powder to set the concealer and reduce shine. Repeat as needed throughout the day for best results.
Avoid Common Mistakes
Hiding a bruise with makeup requires care to look natural. Avoiding common mistakes helps the makeup blend well and last longer. Small errors can make the bruise more visible or cause the makeup to cake. Focus on the key points below to improve your technique.
Overusing Product
Applying too much product makes the bruise stand out. Thick layers can look heavy and unnatural. Use thin layers and build coverage slowly. Dab the product gently instead of rubbing it in. Less is more for a smooth finish.
Too much concealer may crack or peel during the day. It also draws attention to the area you want to hide. Use a small amount and blend well with a brush or sponge. This helps the makeup settle into the skin evenly.
Ignoring Skin Type
Skin type affects how makeup behaves on your skin. Dry skin needs moisturizing before applying concealer. Without hydration, makeup can look flaky or patchy. Oily skin may cause makeup to slide off or look shiny. Use a mattifying primer to control oil.
Select products made for your skin type. Cream concealers suit dry skin better. Powder formulas work well for oily skin. Matching products to your skin keeps the makeup in place longer. It also prevents irritation or discomfort.
Credit: www.lemon8-app.com
Additional Tips For Sensitive Skin
Hiding a bruise can be tricky for sensitive skin. The skin may react to makeup products or removal methods. Extra care helps avoid irritation and redness. Choose gentle products and techniques that soothe the skin.
Using the right products and removing makeup carefully keeps your skin healthy. These tips make covering bruises easier and safer for sensitive skin.
Hypoallergenic Products
Hypoallergenic makeup reduces the risk of allergic reactions. These products are free from harsh chemicals and fragrances. Look for labels that say “hypoallergenic” or “for sensitive skin.”
Mineral makeup often works well for sensitive skin. It contains fewer irritants and provides good coverage. Test any new product on a small skin area first. This step helps avoid unexpected irritation.
Gentle Removal Techniques
Removing makeup without harsh rubbing protects sensitive skin. Use a gentle cleanser or micellar water designed for sensitive skin. Apply the remover with a soft cotton pad. Avoid scrubbing or pulling the skin.
Pat the skin softly to lift off makeup. Rinse with lukewarm water, not hot water. Hot water can dry out and irritate the skin. Follow with a mild moisturizer to soothe and hydrate the area.
Frequently Asked Questions
How Can I Hide A Bruise With Makeup Effectively?
Use a color corrector to neutralize bruise colors. Apply concealer matching your skin tone. Blend well and set with powder for long-lasting coverage.
Which Makeup Products Work Best For Covering Bruises?
Use a green or yellow color corrector for bruises. Follow with a full-coverage concealer. Setting powder helps keep makeup intact all day.
When Is The Best Time To Apply Makeup On A Bruise?
Wait until swelling reduces and skin is clean. Applying makeup on fresh bruises may worsen appearance. Use gentle products to avoid irritation.
Can Makeup Completely Hide Dark Or Severe Bruises?
Makeup can significantly reduce visibility but might not fully hide severe bruises. Layering color correctors and concealers improves coverage for darker bruises.
Conclusion
Hiding a bruise with makeup can boost your confidence quickly. Choose the right colors to cover the bruises well. Blend gently to make the makeup look natural. Use setting powder to keep the makeup in place. Practice helps you get better and faster.
Keep your skin clean before and after makeup. Small steps make a big difference in covering bruises. Now, you can feel comfortable in your skin again. Simple tricks make hiding bruises easy and effective.
