Ever wondered how celebrities and makeup gurus always have that perfectly sculpted face? The secret is contour makeup.
It’s not as complicated as it seems, and with a few simple steps, you can achieve that chiseled, photo-ready look yourself. Imagine enhancing your natural features, like your cheekbones and jawline, with just a few brush strokes. Curious about how you can do it too?
Keep reading to discover the tips and tricks that will transform your makeup routine and boost your confidence. Whether you’re a makeup newbie or a seasoned pro, mastering contour makeup can elevate your beauty game to a whole new level. Are you ready to unlock the secrets of contouring? Let’s dive in!
Choosing The Right Products
Choosing the right products is key to achieving a natural contour look. The right formulas and shades help define your features without looking harsh. Products vary in texture and finish. Knowing which suits your skin type and style makes contouring easier and more effective.
Contour Creams Vs Powders
Contour creams offer a smooth, blendable finish. They work well on dry or normal skin. Creams give a dewy and natural look. Powders are better for oily skin types. They set quickly and last longer. Powders help create sharp, defined lines. Choose creams for a soft, subtle effect. Pick powders for a matte, sculpted appearance.
Selecting Shades For Your Skin Tone
Pick contour shades two to three tones darker than your skin. For fair skin, soft taupes or light browns work well. Medium skin tones suit warm browns or caramel shades. Dark skin tones look great with deep chocolate or espresso colors. Avoid shades that are too orange or gray. Your contour should look natural, not fake.
Tools You’ll Need
Good tools make contouring simple and precise. Use a small angled brush for powders. It helps create sharp lines and blend edges. For creams, a dense makeup sponge or flat brush works best. Blending brushes soften harsh lines for a natural finish. Clean tools often to avoid patchy makeup.
Preparing Your Skin
Before you dive into contour makeup, your skin needs the right preparation. Think of your skin as a canvas. The smoother and more hydrated it is, the better your contour will blend and last throughout the day.
Cleansing And Moisturizing
Start with a clean face to remove dirt, oil, and any leftover makeup. Use a gentle cleanser that suits your skin type—whether oily, dry, or combination.
After cleansing, apply a moisturizer to hydrate your skin. This step prevents your contour from looking patchy or cakey. If your skin feels dry, opt for a richer cream. For oily skin, a lightweight, oil-free moisturizer works best.
Applying Primer For Longevity
Think about primer as the secret weapon for your makeup’s durability. It creates a smooth base that helps contour products stick better and last longer.
Choose a primer that matches your skin needs: mattifying for oily skin, hydrating for dry, or pore-filling if you want a flawless finish. Apply a thin layer evenly across your face, focusing on areas where makeup tends to fade or crease.
Foundation As A Base
Foundation evens out your skin tone and sets the stage for contouring. Pick a foundation that matches your skin perfectly to avoid a patchy look.
Apply foundation using a brush, sponge, or your fingers, blending well into your skin. The goal is a natural finish, so your contour will enhance your features instead of covering them up.
Mapping Your Face
Mapping your face is the foundation of effective contour makeup. It helps you understand where to apply darker and lighter shades to enhance your natural features. Taking time to map your face ensures your contour looks natural and flattering, not harsh or misplaced.
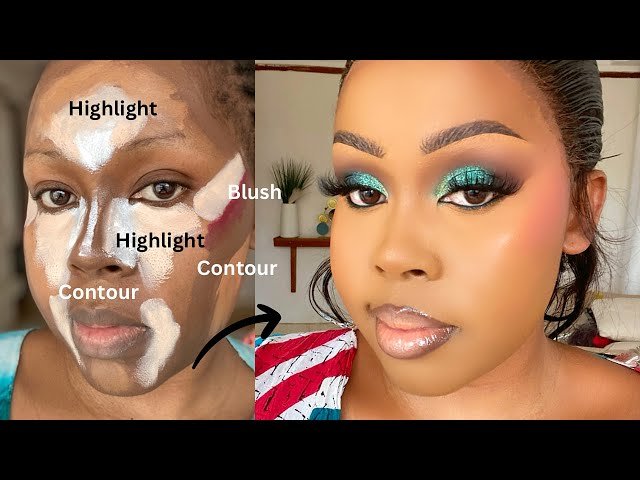
Identifying Key Areas To Contour
Start by looking closely at your face in the mirror. The main areas to contour usually include:
- Under your cheekbones
- The sides of your nose
- Your jawline
- The temples and hairline
These spots naturally cast shadows on your face, so adding a darker shade there creates depth. Have you noticed how a shadow can instantly make your cheekbones pop? That’s the magic you want to replicate with contouring.
Highlight Zones To Enhance Features
Highlighting works hand-in-hand with contouring. It brings forward the parts of your face you want to emphasize. Common highlight zones include:
- The tops of your cheekbones
- The bridge of your nose
- The center of your forehead
- Your chin
- Under your brow bone
Think about where light naturally hits your face. Placing highlights here brightens and lifts those features. Have you ever caught your face glowing in sunlight? That’s the effect you want with highlight products.
Using Face Shapes To Guide Contouring
Not every contour technique suits every face shape. Knowing your face shape helps you decide where to place your contour and highlight for the best effect.
Here’s a quick guide:
| Face Shape | Contour Focus Areas | Highlight Focus Areas |
|---|---|---|
| Round | Sides of cheeks, jawline to slim face | Center of forehead, chin, under eyes |
| Oval | Under cheekbones to define | Forehead center, nose bridge |
| Square | Jawline corners, temples to soften angles | Center of forehead, under eyes |
| Heart | Forehead sides, chin to balance | Cheekbones, under eyes |
Have you tried contouring without considering your face shape? It’s easy to end up with unnatural shadows. Mapping your face shape first helps you highlight your best features smartly.

Credit: www.womensweekly.com.sg
Applying Contour
Applying contour makeup shapes and defines your facial features. It creates shadows that add depth and dimension. Use a contour product a few shades darker than your skin tone. Blend well to avoid harsh lines and keep the look natural. Focus on key areas to enhance your face’s structure.
Techniques For Cheekbones
Find your cheekbones by smiling gently. Apply contour just below the cheekbones, from the ear toward the mouth. Use a brush or sponge to blend the contour upward. Avoid dragging the product too far. This technique makes cheekbones look higher and more defined.
Sculpting The Nose
Apply contour along the sides of the nose to slim it down. Use a thin brush for precise application. Blend the product carefully to keep the look soft. Highlight the bridge of the nose to add contrast. This creates a natural, sculpted nose shape.
Defining The Jawline And Forehead
Contour along the jawline to create a sharper appearance. Blend down toward the neck for a seamless finish. Apply contour on the edges of the forehead near the hairline. This balances the face and reduces the forehead’s width visually. Blend well to keep the look natural.
Blending For Natural Finish
Blending is the key to achieving a natural finish in contour makeup. Without smooth transitions between shades, your contour can look harsh and unnatural. The secret lies in softening the edges and letting the product melt into your skin for that subtle definition everyone admires.
Tools For Seamless Blending
Choosing the right tools makes a huge difference. A dense, angled brush works well for applying contour, but for blending, you want something softer and fluffier. A beauty sponge or a clean, rounded brush helps diffuse the product gently.
Consider using brushes made with synthetic bristles; they blend cream and powder products effortlessly. If you prefer sponges, dampen them slightly to avoid soaking up too much product. Have you tried switching tools mid-way to see how it changes your finish?
Blending Tips And Tricks
Start blending from the center of your contour line and sweep outward using light, circular motions. This prevents harsh lines and creates a gradient effect. Tap or press motions can also help to press the product into your skin for a more natural look.
Don’t rush the blending process. Spend a few extra seconds softening each edge. Remember, blending isn’t about moving product around but about diffusing it evenly across the skin.
Avoiding Common Mistakes
One common mistake is over-blending, which can erase your contour completely. Blend just enough to soften edges but keep the shape intact. Another pitfall is using too much product at once; build your contour gradually.
Also, avoid using dirty brushes or sponges as they create patchy results. Regular cleaning ensures your tools blend smoothly and keep your skin healthy. What blending mistake have you made before that you wish you could undo?
Setting Your Makeup
Setting your makeup is key to keeping your contour fresh and flawless all day. It locks in the color and prevents smudging or fading. A well-set makeup look stays smooth and sharp from morning till night.
Choose products that suit your skin type for the best hold. Light powders and sprays work well without adding heaviness. Setting helps balance shine and maintain the contour’s depth.
Using Setting Powder
Pick a translucent setting powder to avoid changing your contour’s color. Use a fluffy brush to apply it lightly over your face. Focus on areas with contour and highlight to keep them in place.
Pat the powder gently instead of rubbing. This keeps your makeup intact and smooth. Setting powder absorbs oil and reduces shine throughout the day.
Applying Setting Spray
Hold the spray about 8 inches from your face. Close your eyes and mist evenly for a natural finish. Setting spray helps your makeup blend into the skin better.
Choose a spray designed to hold makeup for long hours. It refreshes your look and gives a soft, dewy glow. Allow the spray to dry without touching your face.
Touch-up Tips Throughout The Day
- Carry blotting papers to remove excess oil without disturbing makeup.
- Use a small brush and powder to re-define faded contour lines.
- Keep a mini setting spray for a quick refresh anytime.
- Avoid rubbing your face to prevent smudging the contour.
Small touch-ups keep your contour sharp and clean. Regular care extends the life of your makeup look.
Advanced Contouring Techniques
Advanced contouring takes your makeup game beyond basic shading. It helps you sculpt your face with precision, highlighting your best features while minimizing others. Let’s dive into techniques that adapt contouring to your unique face shape, special occasions, and even how to use color correcting products to perfect your look.
Contouring For Different Face Shapes
Your face shape determines where you place contour and highlight. For example, if you have a round face, contouring the sides of your cheeks and jawline can add definition and create an illusion of length.
Oval faces benefit from contouring the temples and under the cheekbones to enhance natural bone structure. Square faces get softened by shading the jawline and the edges of the forehead.
Try this quick test: pinch the apples of your cheeks and see where the shadow naturally falls. That’s your ideal contour zone. Adjust placement based on how you want to emphasize or minimize areas.
Contouring For Special Occasions
Special occasions call for bolder contouring to stand out in photos and under different lighting. Use a cream contour product for a more intense and long-lasting effect compared to powder.
Add a touch of shimmer on the high points of your face—like the tops of your cheekbones and bridge of your nose—to catch the light beautifully. This technique works especially well for evening events or weddings.
Don’t forget to blend well but don’t be afraid to deepen your contour for a dramatic look. Have you ever noticed how some makeup looks fade in photos? That’s often because the contour wasn’t strong enough for the lighting.
Using Color Correcting Products
Color correctors can transform your contouring by neutralizing unwanted tones before you even start shading. For instance, if you have redness around your cheeks or nose, apply a green corrector to calm the area.
Under-eye circles with a purple or blue tint can be neutralized with a peach or orange corrector, making your contour and highlight appear more natural. This step creates a clean base so your contour stands out without competing with discoloration.
Have you tried layering a subtle contour over color-corrected skin? It makes your contour smoother and your overall makeup look more polished. Remember, prepping your skin well means less product and better results.

Credit: www.shefinds.com

Credit: www.shefinds.com
Frequently Asked Questions
What Products Are Best For Contour Makeup?
Use cream or powder contour products for best results. Choose shades slightly darker than your skin tone. Matte formulas work well to create natural shadows. High-quality brushes or sponges help blend seamlessly for a flawless finish.
How Do I Choose The Right Contour Shade?
Pick a contour shade two to three shades darker than your skin. Avoid overly warm or cool tones for natural depth. Test shades in natural light to ensure they complement your complexion perfectly.
Can Contour Makeup Suit All Face Shapes?
Yes, contouring techniques can enhance any face shape. Adjust placement to highlight your unique features. Use contour to slim, define, or balance facial proportions for a personalized look.
How To Blend Contour For A Natural Finish?
Blend contour edges softly with a damp sponge or brush. Use gentle, circular motions to avoid harsh lines. Blending ensures a seamless, natural shadow effect that enhances your features subtly.
Conclusion
Contour makeup helps shape and highlight your face naturally. Start with light strokes and blend well for a smooth look. Practice makes it easier to find what suits you best. Choose shades that match your skin tone for a subtle effect.
Remember, less is more to avoid a heavy appearance. With patience, your skills will grow, and your face will look more defined. Enjoy the process and have fun experimenting with different styles. Contouring can boost your confidence and enhance your natural beauty.
