
Your makeup sponges work hard every day to help you achieve that flawless look. But have you ever stopped to think about what’s really living inside them?
Dirty sponges can cause breakouts, dull your skin, and even ruin your makeup application. The good news? Cleaning your sponges is easier than you think. In this post, you’ll discover simple, effective ways to keep your makeup tools fresh and bacteria-free.
Ready to give your skin the care it deserves? Let’s dive in!
Why Clean Makeup Sponges Matter
Keeping your makeup sponges clean is more than just a part of your beauty routine—it directly affects your skin’s health and the quality of your makeup application. Dirty sponges harbor bacteria, oils, and dead skin cells, which can cause breakouts or irritation. Have you ever wondered why your skin suddenly flares up after using a sponge for a while without cleaning it?
Beyond skin health, clean sponges help your makeup look flawless. A clogged sponge doesn’t blend makeup evenly, leading to patchy or cakey results. You want your foundation to sit smoothly, not settle into uneven spots.
Preventing Skin Irritations And Breakouts
Makeup sponges collect bacteria and dirt from your skin and the environment. If you don’t clean them regularly, you risk transferring these irritants back onto your face every time you apply makeup.
This can cause redness, pimples, or even infections. Cleaning your sponges reduces these risks and keeps your skin calm and clear.
Improving Makeup Application
Dirty sponges absorb more product and don’t spread makeup well. This means you end up wasting foundation and setting spray without getting smooth coverage.
When you clean your sponges, they stay soft and porous, allowing you to apply makeup more precisely and with less product.
Regular cleaning stops makeup buildup from breaking down the sponge material. This helps your sponges last longer and saves you money in the long run.
Think about how often you replace sponges—cleaning can double their lifespan if done properly.
Maintaining Hygiene And Confidence
Using a fresh, clean sponge gives you peace of mind. You feel confident knowing your tools are safe and sanitary.
Doesn’t it feel better to apply makeup knowing your skin isn’t at risk from hidden germs?

Credit: www.bebeautiful.in
When To Clean Your Sponges
Knowing when to clean your makeup sponges is just as important as the cleaning process itself. Dirty sponges can harbor bacteria, clog your pores, and affect how your makeup applies. But how often should you actually wash them to keep your skin healthy and your makeup flawless?
Signs Your Makeup Sponge Needs Cleaning
Pay attention to how your sponge looks and feels. If it starts to smell off or changes color, it’s a clear sign it needs a good wash. Also, if your makeup doesn’t blend as smoothly as before, your sponge might be clogged with old product and oils.
Cleaning Frequency Based On Usage
If you use your sponge daily, cleaning it every day or every other day is best. For occasional users, washing it at least once a week works well. Regular cleaning prevents buildup that can irritate your skin or cause breakouts.
After Using Different Products
Switching between different makeup products like foundation, cream blush, or concealer? Clean your sponge between uses to avoid color mixing and keep your application fresh. This also helps prevent product contamination, which can lead to skin issues.
Special Considerations For Sensitive Skin
If you have sensitive or acne-prone skin, cleaning your sponges more often is crucial. Bacteria buildup can worsen skin conditions. Think of your sponge as an extension of your skincare routine—it needs attention to keep your skin calm and clear.
Essential Supplies For Cleaning
Cleaning makeup sponges needs the right supplies. Using proper items ensures deep cleaning without damage. These supplies help remove dirt, oil, and bacteria effectively. Keeping your sponges fresh improves makeup application and skin health.
Gentle Cleanser
Choose a mild cleanser made for delicate items. Avoid harsh soaps that can break down sponge material. A gentle cleanser removes makeup residue and bacteria. You can use special sponge cleansers or baby shampoo.
Warm Water
Warm water helps open sponge pores. It makes cleaning easier and more thorough. Avoid hot water as it may damage the sponge. Lukewarm water softens the sponge for better cleansing.
Clean Bowl Or Sink
Use a clean bowl or sink to soak the sponge. This keeps the cleaning process organized. It also prevents dirt from spreading to other areas. Always rinse the bowl or sink before use.
Soft Towel
A soft towel is perfect for drying sponges gently. Avoid rough fabrics that can tear the sponge. Pat the sponge dry instead of rubbing it. This helps maintain the sponge’s shape and texture.
Optional: Olive Oil
Olive oil can help break down stubborn makeup stains. Use it sparingly and rinse well afterward. This natural oil also softens the sponge fibers. It works best for sponges with heavy foundation build-up.
Credit: www.walmart.ca
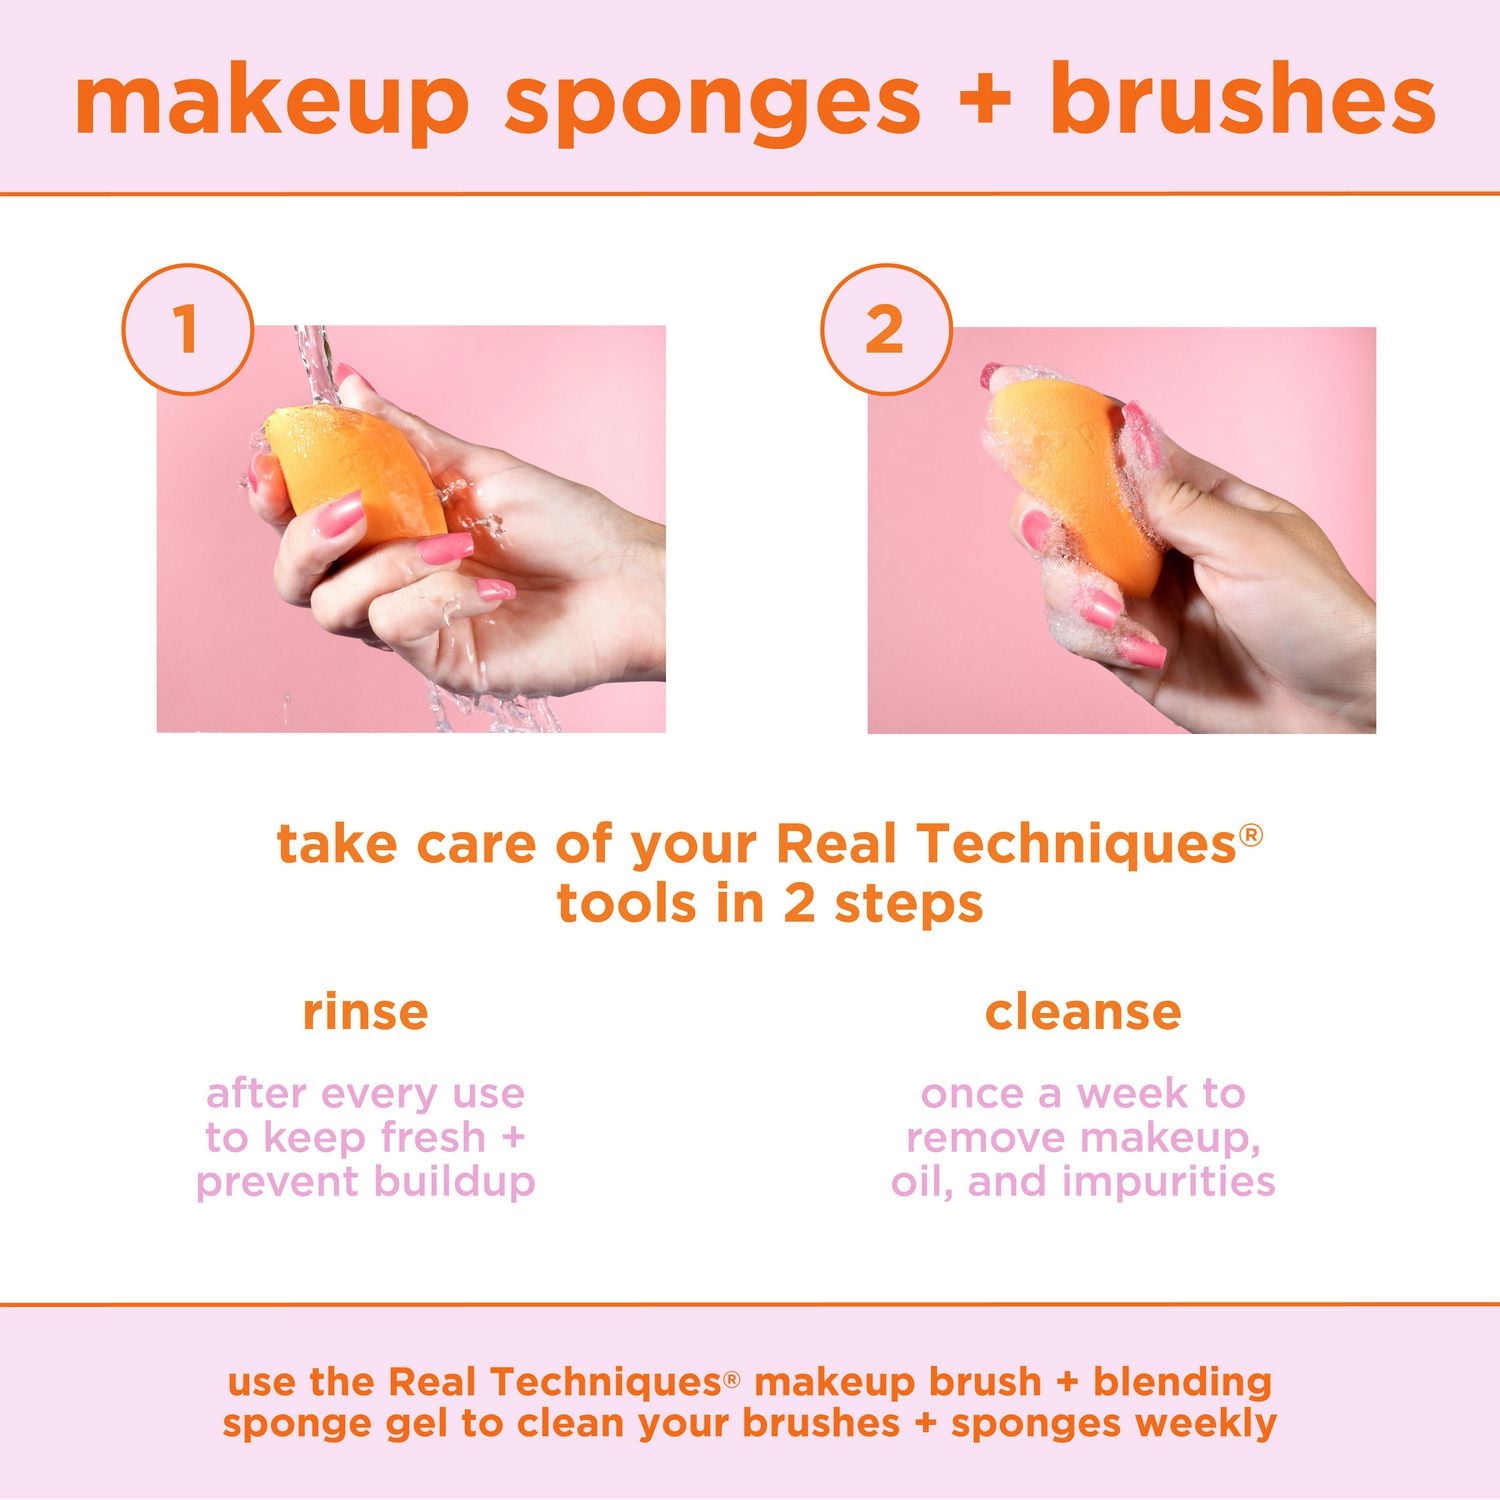
Step-by-step Cleaning Methods
Keeping your makeup sponges clean is essential for flawless application and skin health. Dirt, oils, and bacteria build up quickly, so regular cleaning helps maintain their performance and extends their lifespan. Here are clear, easy ways you can clean your sponges effectively.
Quick Rinse Technique
This method is perfect when you’re short on time but still want to freshen up your sponge. Start by holding your sponge under warm running water. Gently squeeze it several times to flush out excess makeup.
Next, apply a small amount of liquid soap or cleanser directly onto the sponge. Work it in with your fingers, focusing on stained areas. Rinse thoroughly under warm water until the sponge looks clean and no suds remain.
Does your sponge feel softer and look brighter right away? This quick rinse can keep your makeup tools ready between deeper cleans.
Deep Cleaning With Soap
For a thorough cleanse, prepare a bowl of warm water mixed with a few drops of gentle soap or baby shampoo. Submerge your sponge completely and let it soak for about 10 minutes. This loosens stubborn makeup and oils.
After soaking, massage and squeeze the sponge repeatedly while it’s submerged. This action helps release trapped dirt from deep inside. Rinse under warm water until the water runs clear.
Try this deep clean once a week to keep your sponge hygienic and extend its life. Have you noticed how much cleaner your makeup applies after a deep clean?
Microwave Cleaning Trick
If you want to disinfect your sponge as well as clean it, try the microwave method. Mix one cup of water with a tablespoon of mild soap in a microwave-safe bowl. Submerge your damp sponge in the solution.
Heat the bowl in the microwave for about one minute. The heat helps kill bacteria and break down makeup residue. Let the water cool before carefully removing the sponge.
After microwaving, rinse the sponge thoroughly under running water. This trick saved me time and gave my sponge a fresh feel without harsh chemicals. Would you give this a try to boost your cleaning routine?
Drying And Storing Tips
Proper drying and storing of makeup sponges keep them clean and last longer. Wet sponges can grow bacteria quickly. Storing them in the right place helps keep their shape and freshness.
Allow Sponges To Air Dry Completely
After washing, squeeze out excess water gently. Avoid twisting or pulling the sponge. Place it in a clean, dry spot with good airflow. Avoid damp or enclosed spaces. Let the sponge dry naturally to prevent mold.
Use A Clean Surface For Drying
Lay your sponge on a clean towel or mesh rack. This allows air to flow around the sponge. Avoid placing it on bathroom counters or sinks. These areas often have germs that can transfer to your sponge.
Store Sponges In A Breathable Container
Use a container that allows air to circulate. Mesh holders or vented cases work well. Avoid airtight containers which trap moisture. Keeping sponges dry inside the container stops bacteria growth.
Keep Sponges Away From Direct Sunlight
Direct sunlight can dry sponges too fast and cause damage. Store them in a shaded, cool place instead. This helps maintain the sponge’s texture and softness.
Replace Sponges Regularly
Even with good care, sponges wear out. Change your makeup sponge every 1 to 3 months. This keeps your skin healthy and your makeup flawless.
Common Mistakes To Avoid
Cleaning your makeup sponges properly is key to keeping your skin healthy and your makeup flawless. However, many people unknowingly make mistakes that reduce the sponge’s lifespan or fail to clean it thoroughly. Avoiding these common errors will save you time, money, and prevent breakouts caused by bacteria buildup.
Using Harsh Detergents
Many think strong soaps or dish detergents will clean sponges better, but they often damage the material. Harsh chemicals break down the sponge’s texture, making it rough and less effective at blending. Choose gentle cleansers specifically designed for makeup tools to keep your sponge soft and intact.
Not Rinsing Thoroughly
Rinsing your sponge quickly under water might seem enough, but leftover soap or makeup residue can clog pores and irritate your skin. Take your time to rinse until the water runs clear. If you don’t, your sponge might end up dirtier than before, harboring bacteria.
Skipping Regular Cleaning
Some skip cleaning sponges regularly, thinking it’s unnecessary or time-consuming. Using a dirty sponge spreads bacteria, leading to skin issues and poor makeup application. Make it a habit to clean your sponge after every few uses to keep it fresh and safe.
Drying Sponges Improperly
Storing your sponge in a closed container or leaving it damp encourages mold and bacteria growth. Always let your sponge air dry in a well-ventilated area. Have you noticed an odd smell from your sponge? That’s often a sign it’s not drying properly.
Using Hot Water To Clean
Hot water might feel like it cleans better, but it can break down the sponge’s material faster. Lukewarm water is ideal for removing makeup without damaging your sponge. Think about how delicate your skin is—your sponge needs gentle care too.
Extending The Life Of Your Sponges
Keeping your makeup sponges clean is essential, but extending their life can save you money and reduce waste. Proper care not only preserves their shape and texture but also prevents skin irritation caused by old, bacteria-filled sponges. Are you curious about simple habits that can make your sponges last longer?
Clean Your Sponges Regularly
Make a habit of washing your sponges after every use or at least twice a week. This stops makeup buildup and bacteria growth, which can degrade the sponge material. Use gentle cleansers designed for makeup tools, or even mild soap works well.
Dry Sponges Properly
After washing, squeeze out excess water gently without twisting or pulling. Let your sponges air dry in a well-ventilated area to avoid mold. Avoid storing them in closed containers while damp, as trapped moisture can cause damage.
Rotate Your Sponges
Using the same sponge every day wears it out faster. Try keeping two or three sponges and switching between them. This gives each sponge time to dry fully and recover its shape.
Store Sponges Correctly
Keep your sponges in a clean, dry place away from direct sunlight or heat. Sunlight can break down the material, causing cracks or crumbles. A breathable container or mesh bag works best for storage.
Know When To Replace
Even with great care, sponges don’t last forever. Watch for signs like tears, discoloration, or a rough texture. If your sponge feels less soft or breaks apart, it’s time to switch it out for a fresh one.

Credit: www.rmsbeauty.com
Frequently Asked Questions
How Often Should I Clean My Makeup Sponges?
Clean makeup sponges after every use to prevent bacteria buildup. Regular cleaning ensures better makeup application and skin health. Deep clean them at least once a week using gentle soap or sponge cleanser. Dry them completely before reuse to avoid mold growth.
What Is The Best Method To Clean Makeup Sponges?
The best method is to use a mild cleanser or soap with warm water. Gently massage the sponge to remove makeup and dirt. Rinse thoroughly until water runs clear. Squeeze out excess water and air dry in a clean area.
Can I Use Household Products To Clean Makeup Sponges?
Yes, gentle household products like baby shampoo or liquid soap work well. Avoid harsh chemicals or bleach as they damage the sponge. Always rinse thoroughly to remove soap residue. Use products that are safe for skin and sponge material.
How Do I Dry Makeup Sponges After Cleaning?
After washing, gently squeeze out excess water without twisting. Place the sponge on a clean towel in a well-ventilated area. Avoid direct sunlight or heat sources which can degrade the sponge. Let it air dry completely before the next use.
Conclusion
Keeping makeup sponges clean is essential. It prevents bacteria buildup. Simple steps make a big difference. Rinse your sponge after every use. Use gentle soap for cleaning. Let it air dry completely. Regular cleaning extends sponge life. Your skin will thank you.
Cleaner sponges mean healthier skin. Practice this routine weekly. Enjoy using fresh, clean sponges. Feel confident and beautiful every day. Remember, clean tools enhance makeup results. Keep your beauty routine hygienic and effective. Your skin deserves the best care. Happy cleaning!
