Do you want to enhance your natural features and give your face a stunning, sculpted look? Learning how to apply contour makeup can transform your appearance in minutes.
Whether you’re aiming for subtle definition or a bold, dramatic effect, this simple technique can highlight your best angles and boost your confidence. Keep reading, and you’ll discover easy steps and expert tips that make contouring quick and foolproof—so you can look and feel your best every day.
Credit: www.lemon8-app.com
Choosing The Right Products
Choosing the right products for contour makeup is crucial to achieving a natural and flattering look. The shades, formulas, and tools you pick can either enhance your features or create unwanted harsh lines. Understanding these elements will help you work with your unique skin tone and texture for seamless application.
Contour Shades For Skin Tones
Picking the right contour shade depends heavily on your skin tone. If your contour is too dark or too warm, it can look unnatural. Aim for shades that are 1 to 2 tones darker than your skin but avoid anything too orange or red.
- Fair skin: Choose cool-toned taupe or light brown shades to mimic natural shadows.
- Medium skin: Opt for warm browns with a slight golden or caramel undertone.
- Deep skin: Rich chocolate browns or cool deep browns work best to create depth without looking ashy.
Have you noticed how some contour colors blend effortlessly while others sit on top? This often comes down to matching the undertone and depth of your skin.
Cream Vs Powder Contours
Cream contours offer a dewy finish and blend smoothly on dry or normal skin. They work well if you want a more sculpted look with buildable coverage. However, creams can feel heavy or slide off on oily skin if not set properly.
Powder contours are lightweight and perfect for oily or combination skin types. They’re easier to blend quickly and tend to stay put throughout the day. But powders can sometimes emphasize dry patches if your skin isn’t well-moisturized.
- Cream:Great for moisturizing skin, gives a natural glow.
- Powder:Ideal for setting makeup, controls shine.
Think about your skin type and the finish you want before choosing between cream or powder. Have you tried mixing both for a customized effect?
Essential Tools For Application
Using the right tools can make or break your contour application. Brushes, sponges, and even your fingers each offer different levels of control and finish.
- Contour brush:Angled brushes help create precise lines and blend contour seamlessly.
- Beauty sponge:Perfect for buffing cream contour into the skin for a natural finish.
- Fingers:Sometimes, the warmth of your fingers can melt the product into your skin for a soft look.
Try different tools to see which gives you the best control and blending power. What’s your favorite tool to create that perfect shadow?
Preparing Your Face
Preparing your face properly sets the stage for flawless contour makeup. A clean and smooth base helps the contour products blend well. It also ensures your makeup lasts longer and looks natural. Follow these simple steps to get your skin ready.
Cleansing And Moisturizing
Start with a gentle cleanser to remove dirt and oil. This clears your skin and prevents clogged pores. After cleansing, apply a light moisturizer suited to your skin type. Moisturizing hydrates your skin and creates a smooth surface. Let it absorb fully before moving to the next step.
Applying Primer And Foundation
Primer helps fill in fine lines and blurs pores. It also makes your makeup stay put throughout the day. Use a small amount and spread it evenly on your face. Next, apply foundation to even out your skin tone. Choose a foundation that matches your skin color exactly. Use a brush, sponge, or fingers to blend it well. This creates a perfect canvas for contouring.
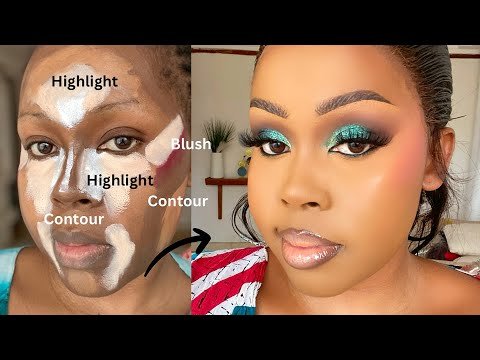
Mapping Your Face
Mapping your face is the first and most important step in contour makeup. It helps you understand where to place highlights and shadows. This step creates a natural and balanced look. Knowing your face shape guides your contour placement. Use a light hand to sketch the areas before applying makeup. This makes blending easier and ensures a flawless finish.
Identifying Highlight Areas
Highlights bring light to your face. They make certain features stand out. Focus on the high points where light naturally hits. These include:
- Center of the forehead
- Bridge of the nose
- Under the eyes
- Top of the cheekbones
- Center of the chin
- Above the jawline
Use a shade lighter than your skin tone. This brightens and lifts these areas subtly.
Marking Contour Zones
Contours create shadows to shape your face. Identify areas to slim or recede. Common contour zones include:
- Sides of the forehead near the hairline
- Under the cheekbones
- Sides of the nose
- Jawline
- Temples
Choose a shade darker than your skin tone. Apply softly to avoid harsh lines. Blending is key for a natural effect.
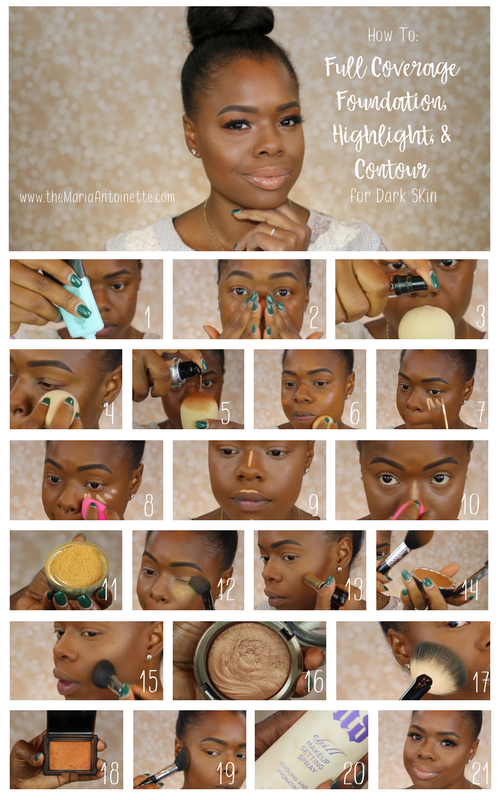
Credit: themariaantoinette.com
Applying Contour
Applying contour makeup helps enhance your natural face shape. It creates shadows and highlights to give your face more depth. Using the right techniques makes your features stand out softly and beautifully. Follow simple steps for each area to achieve a balanced look.
Techniques For Cheekbones
Start by finding your cheekbones. Suck in your cheeks to see the hollows. Apply contour powder or cream just below the cheekbones. Blend the product upward toward your temples. This lifts the face and adds definition. Use a brush or sponge for smooth blending.
Defining The Jawline
Apply contour along the jawline’s edge. Start near your ears and blend toward the chin. This creates a sharper jawline and reduces the appearance of a double chin. Blend well to avoid harsh lines. A matte contour product works best here.
Shaping The Nose
Use a small brush for nose contouring. Apply contour on the sides of the nose bridge. Avoid the center to keep it looking natural. Blend the lines well to soften the edges. Highlight the nose’s bridge to add contrast and lift.
Contouring The Forehead
Apply contour along the hairline on the forehead. This makes the forehead appear smaller. Blend the contour downward toward the temples. Use a light hand and blend thoroughly. This technique balances the face and adds warmth.
Blending For Natural Look
Blending is the key to a natural contour makeup look. Harsh lines make the face appear unnatural and heavy. Soft edges create depth and dimension that look like your real shadows and highlights. The right blending technique turns makeup into a seamless part of your skin. It helps your features stand out without obvious makeup marks.
Good blending takes patience and the right tools. It smooths out product and removes excess color. A well-blended contour appears soft and subtle. Your face looks sculpted but still fresh and natural. Avoiding harsh edges keeps your makeup looking polished and believable.
Tools And Methods
- Sponge: Use a damp makeup sponge to press and bounce the product into the skin. It helps blend cream and liquid contours smoothly.
- Brush: Choose a fluffy contour or blending brush for powder products. Use small, circular motions to soften the edges.
- Fingers: Warm fingers can blend cream products well. Use gentle tapping and dragging motions to diffuse the product.
Start blending from the center of your contour line and move outwards. Blend in light layers to build up the shape gradually. Patting motions work better than rubbing to avoid removing product.
Avoiding Common Blending Mistakes
- Over-blending: Too much blending can erase your contour completely. Blend just enough to soften edges.
- Using the wrong tool: A stiff brush or dry sponge can leave streaks and harsh lines.
- Applying too much product at once: Layer product lightly to control the intensity and ease blending.
- Neglecting skin texture: Blend product into skin texture, not against it, for a natural finish.
- Ignoring lighting: Blend in natural light to check for harsh lines or uneven spots.
Adding Highlights
Adding highlights to your contour makeup brightens your face. It lifts your features and adds a healthy glow. Highlights create contrast with the shadows, making your face look more defined. Using the right shade and placing it correctly helps achieve a natural, radiant look.
Choosing Highlight Shades
Select a highlight shade lighter than your skin tone. For fair skin, choose soft pinks, peaches, or light creams. Medium skin tones look great with warm champagne or golden hues. Darker skin benefits from rich gold, bronze, or caramel shades.
Avoid shades that are too bright or too glittery. Opt for a subtle shimmer or a satin finish. This keeps the highlight natural and not overpowering. Cream and liquid highlights blend easily for a smooth finish.
Placement Tips For Radiance
Apply highlights on the highest points of your face. These spots catch light naturally. Focus on the tops of your cheekbones to lift your face. Add a touch to the bridge of your nose for a slim effect.
Highlight your brow bone to open your eyes. The cupid’s bow above your lips looks fuller with a soft glow. A small dot on the center of your chin adds balance.
- Use a small brush or fingertips for precise application.
- Blend well to avoid harsh lines.
- Build up slowly for a natural shine.
Setting Your Makeup
Setting your contour makeup is a crucial step to keep your hard work in place throughout the day. Without proper setting, even the best contour can fade or blend away, leaving your face looking flat. The right products not only lock in your makeup but also enhance its finish and longevity.
Using Setting Powder
Setting powder helps absorb excess oil and gives your contour a matte, smooth finish. Choose a translucent powder to avoid altering the shade of your contour.
- Use a fluffy brush to lightly dust the powder over your face, focusing on the contoured areas.
- Be gentle—too much powder can dull your highlight and contour contrast.
- Press the powder into your skin instead of sweeping to keep the contour sharp.
Have you ever noticed your contour disappearing by midday? A light layer of setting powder can prevent that from happening without making your skin feel heavy.
Setting Sprays For Longevity
Setting sprays are perfect for locking in your makeup and adding a fresh, natural finish. They work by creating a thin, flexible layer that holds everything together.
- Hold the spray about 8-12 inches from your face and mist evenly.
- Look for formulas that match your skin type—hydrating sprays for dry skin, mattifying for oily skin.
- Some sprays can even enhance the glow in your highlight, making your contour pop more.
Think of setting spray as the final sealant that keeps your contour intact through sweat, touch-ups, and daily activities. Which setting spray have you found that truly keeps your makeup fresh all day?
Expert Tips And Tricks
Applying contour makeup can enhance your natural features and add dimension to your face. Expert tips help you achieve a flawless look with ease. These tricks ensure your contour looks natural and suits your unique style.
Customizing Contour For Face Shapes
Different face shapes need different contour techniques. Understanding your face shape guides where to apply contour.
- Oval: Contour under cheekbones and jawline to add definition.
- Round: Shade the sides of the forehead and cheeks to slim the face.
- Square: Soften the jawline and temples with contour to create balance.
- Heart: Apply contour on the sides of the forehead and under the chin.
- Long: Contour the forehead and chin to shorten the face visually.
Use a light hand and blend well for a natural effect.
Contouring For Different Occasions
Adjust your contour based on the event and lighting. Subtle contour works best for daytime or office settings.
- Daytime: Use light contour shades for a soft, natural look.
- Evening: Choose deeper shades for more dramatic shadows.
- Photoshoots: Apply contour more boldly to stand out in pictures.
- Special events: Combine contour with highlight for a polished finish.
Always blend thoroughly to avoid harsh lines under any light.
Maintaining Skin Health
Good skin health improves contour application and appearance. Cleanse your face before applying makeup to remove dirt and oils.
- Use gentle exfoliation to clear dead skin cells weekly.
- Moisturize daily to keep skin smooth and hydrated.
- Choose contour products that suit your skin type.
- Remove makeup completely every night to prevent breakouts.
- Avoid heavy products that clog pores and irritate skin.
Healthy skin provides a perfect canvas for contour makeup.

Credit: www.shefinds.com
Frequently Asked Questions
What Tools Do I Need For Contour Makeup Application?
You need a contour brush or makeup sponge, contour powder or cream, and a blending brush. These tools help create sharp and natural-looking shadows.
How Do I Choose The Right Contour Shade?
Pick a contour shade two to three tones darker than your skin. Avoid shades that are too warm or orange for a natural look.
Where Should I Apply Contour On My Face?
Apply contour under cheekbones, along the jawline, sides of the nose, and temples. These areas help define and slim the face shape.
Can I Use Contour Makeup On All Skin Types?
Yes, contour makeup suits all skin types. Use cream formulas for dry skin and powder formulas for oily skin for best results.
Conclusion
Mastering contour makeup can enhance your natural beauty. With practice, it becomes simple. Remember to blend well for a natural look. Use the right shades for your skin tone. Light for highlights, dark for shadows. Start with small amounts and build up.
This technique adds depth and dimension to your face. It can highlight your best features. Always ensure your makeup is even. Practice makes perfect. Soon, you’ll apply contour like a pro. Enjoy your makeup journey! Feel confident and beautiful every day.
Keep experimenting with styles and techniques.
